User Tools
Sidebar
Table of Contents
Uploading Images For Use in Templates
Here we'll describe how you would upload a custom image to your template set and then how you would reference that image within the templates of that template set. Uploading images through the DESIGN > MANAGER admin tool keeps those images within the template set. If images are kept within the template set they are easily backed up and restored with the template set in one zip backup file. The backed up zip file also makes it easy to move a template set from Geo installation to another.
Getting The Image Into Your Template Set
Using Your FTP Software
The first step is to get the image into your Geo template set. You do that by uploading it into the following directory of your working template set:
/external/images/
You can simply upload into that template set or any subdirectory within that directory. You can create your own custom directories within the above directory to better organize your images if you need. Anything within that directory will be backed up into the backup zip file created by the software. You can use your local ftp software to get that file into the above directory but you must know the full path to that directory. The full path starting from the base directory the software is installed to depends your working template sets name:
/geo_templates/[your custom template set name]/external/images/
And of course within the above path exchange "[your custom template set name]" for the name of your working template set as it appears in the DESIGN > TEMPLATE SETS admin tool. You would upload that image within the above directory and it will be available for inclusion within a template of your working template set.
Once you've uploaded your image this way you will then need to click the Re-Scan Attachments button next to the template set you uploaded the image into within the following admin tool:
DESIGN > TEMPLATE SETS
Using The Geo Manager Tool
A second method of getting the image into your template set is to use the upload feature within the DESIGN > MANAGER admin tool. To do that you would navigate to your working template set within the DESIGN > MANAGER. One quick way of doing that is to click "edit templates" next to that template set within the DESIGN > TEMPLATE SETS admin tool. Once in the DESIGN > MANAGER admin tool you would navigate to the following directory in your template set:
/external/images/
Or to any directory within that directory you like or possibly created. Any directory in the above directory can be used to save your image and reference within any template of that template set. Once navigated to that directory to upload the file you would click the upload button within top right of the DESIGN > MANAGER admin tool as you see here:
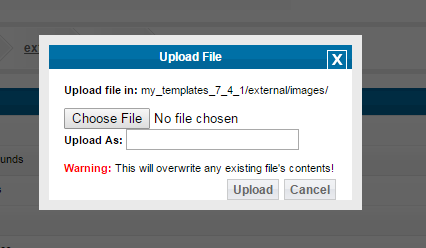
Once you click that button you would see the following popup:
Within that box you would click the "choose file" button and choose the file you want to upload to the server into that template set. Then within the "upload as:" box you would set the name of the file you want to be within your template set. Once all that is done click the "upload" button.
Now that image should within the directory you were navigated to within the DESIGN > MANAGER admin tool when you clicked the "upload" button.
Referencing That File In Your Templates
It's one thing to make the image available now you must insert that image within your design. If the image you inserted was named:
example.png
and you uploaded that image to the following example directories within your working template set:
/external/images/
/external/images/test/
/external/images/my_images/
You would be able to reference that image within the html source (using DESIGN > MANAGER admin tool) of your template using the following respective tags:
{external file='images/example.png'}
{external file='images/test/example.png'}
{external file='images/my_images/example.png'}
Let say you were using that image within an html <img> tag. You would use it like:
<img src="{external file='images/example.png'}" alt="example png file" />
<img src="{external file='images/test/example.png'}" alt="example png file" />
<img src="{external file='images/my_images/example.png'}" alt="example png file" />
Using that tag in that way will tell smarty to replace that {external} tag with the proper path reference to that image within that location. Once that is applied and you looked at that code on the client side using the html source feature of the browser you would see this if the above were used:
<img src="/geo_templates/[your working template set name]/external/images/example.png" alt="example png file" />
<img src="/geo_templates/[your working template set name]/external/images/test/example.png" alt="example png file" />
<img src="/geo_templates/[your working template set name]/external/images/my_images/example.png" alt="example png file" />


