Sidebar
how_this_software_works:multi_level_fields:start
Multi-Level Fields 101
Added in Version 7.1.0 Beta 4
Below are step-by-step instructions to get you started using multi-level fields on your site. Note that this is meant to get you started, not a full instruction set from start to finish, because how you set it up will depend on how you wish to use the multi-level fields. For further help see the applicable pages in the wiki Listing Setup > Multi-Level Fields
This feature is added in Version 7.1.0. You will need to be using the latest version of the software to use multi-level fields.
- In the admin, go to Listing Setup > Multi-Level Fields. On that page, at the bottom, use the tool to create a new multi-level field.<
- Click Show Values next to the newly created field.<
- Add some values, we recommend using the Bulk Add to quickly populate your field with all the values you want. First you would add all the "top level" values, then click on each value to add "child values" that would show as options for that value. <
- Click on Edit Levels at the top of the page to edit the labels for each level. <
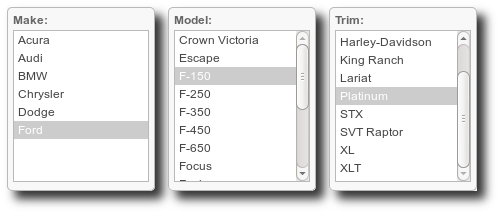
- Give each "level" a label. For instance, if you are using this for make / model / trim selection, and the first level was filled with car makes, you would enter "Make" for the label for level 1, then "Model" for level 2, etc. Note that the software automatically adds a colon ":" after the label in applicable places, so do not include a colon at the end of the label yourself. <
- Edit the Fields to Use settings:
- Is the multi-level field only going to be used in a category? Then go to Categories > Category Setup, navigate to the category you want to use the field in, click edit for that category, then click Fields. If you are not already using category-specific fields for that category, you will need to change the setting at the top of the page to start using them.<
- OR are you using this field site wide? If so, in the admin go directly to the page Listing Setup > Fields to Use <
<
- When you are on the Fields to Use page, you will see a section named Multi-Level Fields that will look something like the illustration below:
- Check the Enabled box for each of the levels. Also, if you wish the fields to be able to be edited once the listing is live, check the box for Editable as well on the first level. If you wish certain levels to be required, check the applicable required box. <
- If you wish for any of the levels to show when browsing the website, click on the various Display In… tabs, and check the boxes to make that level show in that spot. This allows for "level specific" showing, for instance if you are using "make > model > trim", you could check the box for level 3 trim to make it show when browsing the site, but "not" check make or model and those would not show. Or check them all, the choice is yours! <
- Click Save to save your changes in fields to use. <
- In Addons > Manage Addons ensure that the addon Core Display Functions is installed and enabled, if it is not already then install and/or enable it now. <
- Edit the applicable Browsing Filter settings depending on if you are using this for a specific category, or site-wide:
- IF Category specific, go back to edit the category like you did earlier. This time, click on Browse Filters. <
- If Site wide: In admin, go directly to Addons > Core Display Functions > Browsing Filter Settings. <
<
- On the browsing filter page, you should see a section named Multi-Level Fields with a list of all the levels. If you do not see this section, you may have not enabled the multi-level field properly for the category / side wide fields to use settings, double check those settings if that is the case. <
- Check the box for enabled to enable any of the multi-level fields. <
- Note that for browsing filters, it does NOT show a browsing filter until there is at least one listing that would show with the filter in place. In other words, if there are no listings with "ford" selected, then that option will not show on the browsing filters. That is the case for all of the browsing filters. <
- You are done setting it up in the admin! Now just place a test listing, if you set up the field to be in a specific category, place the listing in that category, and the multi-level field(s) should show as selections when placing the listing! Once you have a few test listings in place (or normal non-test listings) that use the multi-level fields, you can start using them in the advanced search and in the browsing filters! <
how_this_software_works/multi_level_fields/start.txt · Last modified: 2014/09/25 16:55 (external edit)
Except where otherwise noted, content on this wiki is licensed under the following license: CC Attribution-Noncommercial-Share Alike 4.0 International


