User Tools
Sidebar
Table of Contents
Values [S]
Admin Page: Listing Setup > Multi-Level Fields > Values [S] - Sub-Page (Not in Admin Menu)
Page Added in Version 7.1.0
This page allows you to edit the values and sub-values in a specific multi-level field group.
Multi-Level Field Group
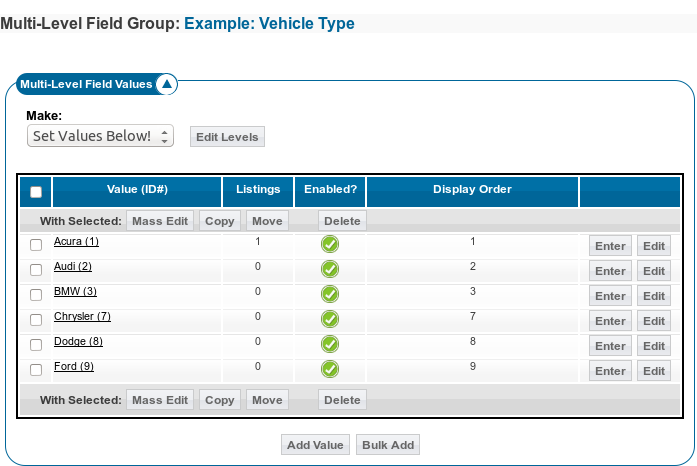
This shows you what multi-level field you are currently editing values for. If you have more than one multi-level field, always double check that you are working with the correct values by looking at what it lists. In the screenshot above, we are viewing values for the multi-level field group named Example: Vehicle Type.
Level Drop-Downs
The screenshot above illustrates what the drop-downs would look like when you have "entered" the "Ford > Mustang" and are viewing sub-values. When you click Enter for a value, or click on the value itself in the list of values1), so that you are editing sub-values for the value, the drop-downs displayed at the top will help to illustrate "where" the values are. This helps to visualise the "parent / child" relationship between the values and sub-values.
The drop-downs are for illustration purposes only to show you what values you are changing, they only serve as a "visual breadcrumb". The drop-downs themselves are non-functional, and each drop-down will only have a single entry, this is the normal behaviour. When you go into "Ford > Mustang" values for instance, the drop-downs at the top will look like they do in the screenshot: it will show "Ford" as the single entry in the first drop-down, and "Mustang" as the single entry in the second drop-down.
Above each drop-down it will display the level's label. In the screen-shot, the first level has a label of "Make:", second level has label of "Model:" and the third, currently viewing level has a label of "Trim:". You can change the labels by clicking on Edit Levels button next to the drop-downs. Note that the "parent" level labels serve as links to edit the values in that level. In the screenshot above, you could click on "Model" to view all the model values under "Ford". Or you could click on "Model" to view all the values at the top level for the different Models. You may also notice, that the labels are appended with a colon : that is not part of the actual label's language text.
List of Values
You will see a list of all the values that are a "child" of the currently selected value, or the top level of values if you have not clicked on any values yet. See the descriptions below for explanation of each part.
Pagination
Note that pagination is not pictured in the example screenshot. When the number of values goes over a certain amount, the values will be broken up into pages, to prevent the site from timing out on installations with a lot of values to display. Note that unlike pagination showing on the client side, you are able to click an all option, which will show ALL of the values on a single page. Just be aware, this can cause the site to time out or give errors, or may simply take a very long time to load. This is normal on sites with hundreds or thousands of possible values in a single level.
The "all" option is there to make it easy to manage all of the values at once using the "with selected" tools, however if there are too many values, it may simply not work for your site. You would have to simply work with a few values at a time if that is the case.
<tip c n>Note: While the system is designed to handle massive quantities of values, part of that design is to use pagination to display the values a few at a time. As a convenience, we do provide the "all" option in the pagination in the admin for the values, however that option may simply not work if your site has enough values, it can cause the site to give an "out of memory" error or possibly cause it to time out. We advise to not use the "all" option if you have enough values to fill lots of pages.
Even there is no "software limitation" on the number of values or levels of values, and the software is designed to be as optimised and efficient as possible even with large quantities of values, you may be limited by the server you are running the software on. In particular, if you are on a shared server, if you have too many values it can take a lot of space in the database(along with other resources, such as bandwidth), that may take you over the shared hosting "limits".</tip>
Checkbox
The checkbox in the header section of the list acts as a select all / deselect all. When you check the box for one or more values, you can use the various tools listed in With Selected: Tools section.
Value (ID#)
This is the value, and the value's ID. Note that the value's ID is listed for your reference, as you can enter the ID to move or copy values. You can also use the value ID for more advanced template design techniques.
Listings
The number of listings that have this value set. Pay close attention to this number when you are editing those values, as it will affect listings that use the values as well.
Enabled?
Whether or not a value is enabled. You can disable a value, and that value or any sub-values will not show as an option when placing listings or when searching or using browse filters.
Note that you can click on the enabled / disabled icon as a shortcut to quickly toggle a single value from being enabled or disabled, without having to go into the edit dialogue.
Display Order
The values are naturally displayed in "alphabetic" order, if all of the display order numbers are the same for all the values. If you wish to change the order, do so by manipulating the display order number values. Note that you can change the display order value for multiple values at once using the Mass Edit tool.
Enter
The Enter button will "enter" that value, and show sub-values that are "children" of that value if there are any. Clicking on the enter button has the same effect as clicking on the value's value in the first column.
Edit
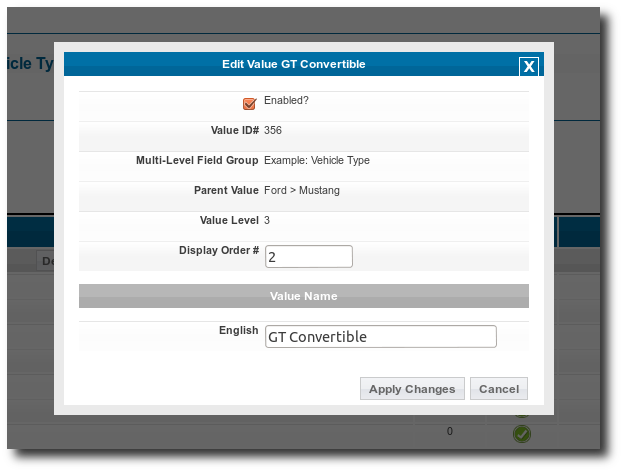
This allows you to edit the individual value, clicking the button will bring up a dialogue as illustrated below:
Enabled
Whether the value is enabled or not.
Value ID#
The ID of this value, which may be useful for directly referencing a specific value for various purposes.
Multi-Level Field Group
This is the multi-level field group. Note that if you wish to change the value to a different multi-level field group, you can use the Move tool.
Parent Value
This is the parent value (if the value is not a "top level" value). In other words, these are the parent values that must be selected in order for this value to show as an option.
Value Level
The value's level.
Display Order #
The display order number, allows you to change the display order number if you wish to change the order the values are displayed in.
Value Name
The value name, set per language.
Note that this is truely a "multi-language" capable feature, as it will always show the value in the language that the visitor currently has set. Even if the seller uses one language the visitor will still see the name for the language they have set currently.
With Selected: Tools
Each value in the list of values has a check-box on the far left. It also has a check/un-check all checkbox in the header of the list. When you select one or more values, you can use various tools to help administer multiple values at once. Each tool is described below.
<tip c n>Note: If there are a lot of values2), take note if you see page numbers listed. Even though you may click to "select all", if there are multiple pages of values, you are only selecting the values on that page. If you need to work with all of the values, click on the "all" entry to view all the values at once.</tip>
Mass Edit
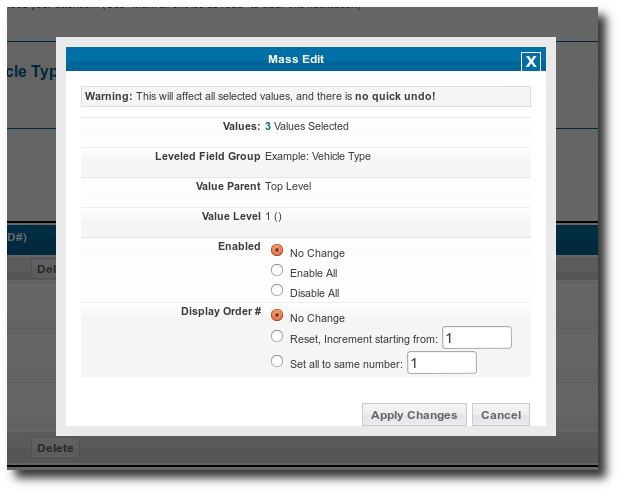
This tool allows you to edit one or more values at once.
<tip c w>Warning: As it states in the warning on the tool, there is no quick undo, make sure you pay special attention when making a mass edit to make sure you are making the changes you want to the values you want.</tip>
Values
Lists the number of values that are selected. Ensure that the number is what you are expecting before proceeding, as there is no "undo" for mass edit.
Multi-Level Field Group
This lists the name given to the multi-level field group, ensure that it is the correct one.
Value Parent
Shows you what the parent value(s) are, if any.
Value Level
The level of the value(s) you are editing. Make sure this is the level you were expecting to edit values in.
Enabled
Allows you to change all the selected values to either be enabled or disabled. The default selection makes no changes.
Display Order #
Allows changing the display order for all of the selected levels if desired. The default selection makes no changes. This has 2 options, you can either set all of the display orders to the same number that you specify. Or you can set it to start at a specific number and increment the number by one for each value. In other words if you select that option and set it to start at 5, the first value would be set to display order of 5, the next value would be set to 6, the next 7, and so on.
This is a very useful tool if you have added new values and wish for them to show in alphabetical order. First, you would select all the values, and set the display order to the same number. Then select them all again, this time make them increment starting from value of 1. Now all the values are ordered in alphabetical order!
Copy
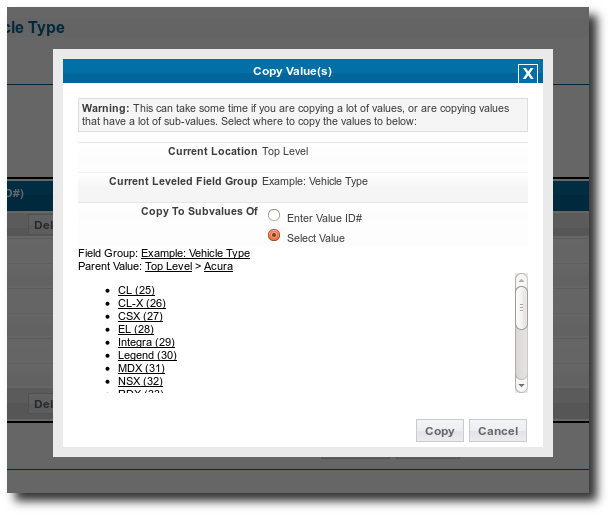
This option allows you to copy values from one sub-value to another.
<tip c n>Note: As it says in the warning box on the copy tool, it can take some time to copy the values, especially if you selected a lot, or the values you selected have a lot of sub-values. The copy does a complete copy, including sub-values.</tip>
FROM Multi-Level Field Group
Lists the "from" multi-level field group. Ensure this is what you are expecting before doing the copy.
FROM Parent Value
Lists the parent value(s) if applicable for the "from" location of the values being copied.
Copy TO Subvalues Of
Here you can enter the "parent value ID" if you have it available. Or if you do not, choose the "Select Value" option, and you will be able to "browse to" where you would like to copy the values to. Not shown in the screenshot, if the "from" value is not the top level, it will also give the option to copy to the top level of the current multi-level field.
When using the option Select Value, where it lists the field group, you can click on the field group name if you wish to copy it to a different field group. That will bring up a list of all the multi-level fields, you would simply click on the one you wish to copy to.
Then "navigate to" where you wish to copy the values to. Once the "Field Group" and "Parent Value" lists the place you would like to copy the values to, click the Copy button to perform the copy.
Move
Allows moving values from one parent value to another, even in a different multi-level field. The options are exactly the same as noted for Copy, refer to that section for more information on what it does. The only difference is that the copy makes a full copy, whereas move changes the parent value of the selected value(s), effectively removing them from the old spot and adding them to the new spot.
Delete
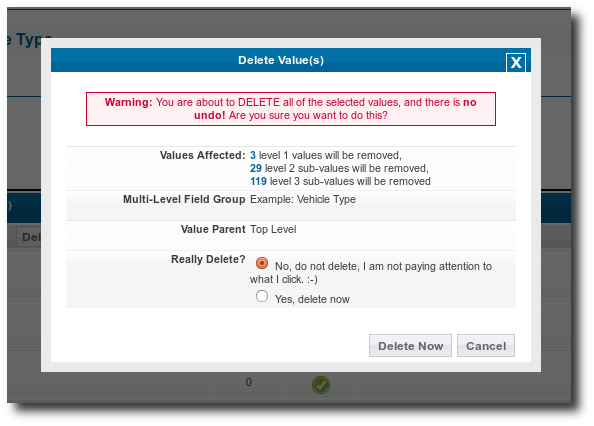
This will delete the selected values, and all sub-values if there are any.
<tip c w>Warning: As the warning on the tool states, there is no undo to this action! If you remove the wrong values, you will have to re-add all of them back, and if there are listings in the system that used the old values, they will no longer be assigned correctly for those listings. So use caution when removing values!</tip>
Values Affected
This lists the number of values affected, including number of sub-values. Verify that those numbers look correct before proceeding.
Multi-Level Field Group
Gives the name of the multi-level field that the values are being removed from. Make sure this is the correct one.
Value Parent
Lists the parents to the values being deleted, verify that they are correct before proceeding.
Really Delete?
This is a double verification, to prevent accidental deletion. The default selection of No, do not delete, I am not paying attention to what I click. ![]() will result in nothing being deleted, you must change the option selected to Yes, delete now to actually perform the deletion.
will result in nothing being deleted, you must change the option selected to Yes, delete now to actually perform the deletion.
Bulk Add
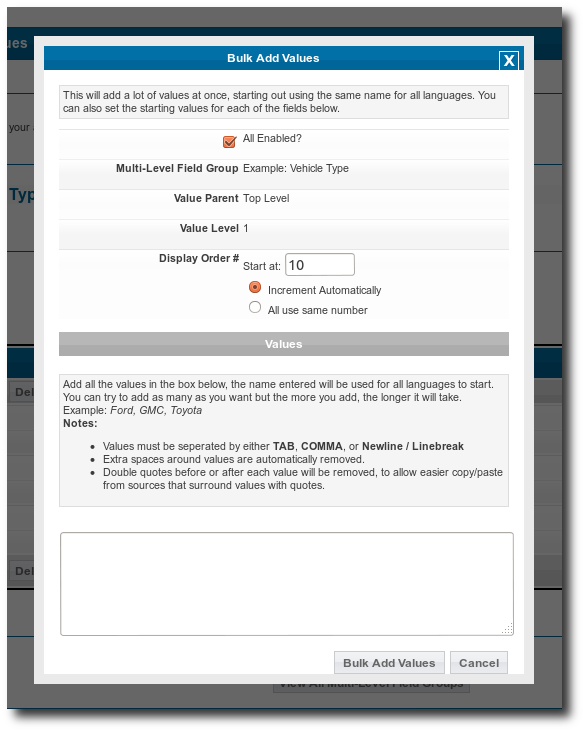
Use this tool to add as many values at once to the current value (or to the top level) as you wish. This button will open a dialogue as illustrated below.
As you can see, the tool has instructions printed on it. You can find even more details below.
All Enabled?
Check to start all of the values as enabled.
Multi-Level Field Group
This lists the multi-level field group that the values are being added to. Verify that it is correct.
Value Parent
Shows the value's parent, unless the value is being added to the "top level" of a multi-level field.
Value Level
The level that the values are being added at, verify that you are adding to the expected level.
Display Order #
You can enter the display order number to use. The number will start with a value that is the highest display order currently found for the location the values are being added.
You can choose to either use the same display order for each one, or increment the values so that the first value is 5, next is 6, next 7, and so on.
Values
Read the advice on the bulk add tool. Essentially you have a text-box that you will enter all the values in. The values must be separated by a comma, a tab, or a "newline" (line break / return).
All you need is a list of values somewhere, just copy that list into the box.
Note that currently it adds one level at a time. This is only a restriction as we could not find any "standard industry format" that could be used to determine the "parent / child" relationship for each value. If you know of such a standard, please let us know, we would love to update the tool to be able to add multiple levels at once if possible!

