User Tools
Sidebar
This is an old revision of the document!
Table of Contents
Help for Admin Menu Page: Design > Template Sets
Template Sets
The file-based templates in the Geo software are organized into Template Sets, located in the software in the directory:
geo_templates/
This page allows you to activate, change active template seek order, deactivate, clone, change which sets you are working with, download, and upload template sets.
What is a Template Set?
A template set can be thought of as a "theme" or a "skin" for the site. You can switch between what template set (or even multiple template sets) are used just by "flipping a switch" in the admin panel. You can create one from scratch, start from the default ones that go with the software, or even upload a template set that a 3rd party designer creates for use with the Geo software. Once you create your template set, you can easily transfer it to other installations, or if you are a designer, can sell your custom templates.
For a more advanced explanation:
A template set is a sub-folder in the geo_templates/ folder. A template set can have file templates, media files1), and PHP files that store different aspects of the design, such as what template is attached to what page in the software2).
A template set can easily be backed up (just download it using the download button!) or restored (just upload the template set file using the upload button!). It can also be easily copied from one site to another3), and the design will be kept intact, with no changes needed in the admin panel besides "activating" the template set.
The templates are broken up into 5 main sub-folders, each for it's own type of files:
- main_page/ folder : Main Page Templates: These templates are used for the "overall" templates and sub-templates used for each page.
- external/ folder : Media Files: These are CSS files, JS File, and images that are referenced from the main page templates. Sometimes CSS or JS files here will be used by modules or system templates, especially with highly dynamic parts of system or module templates.
- module/ folder4) : Module Templates : These are template files that are responsible for displaying each of the modules within the system. The template file name will correspond with the tag name used to display that module within a main page template.
- system/ folder5) : System Templates : These are template files that display the dynamic part of each page, it is what replaces the {body_html} tag within the main page templates. For instance, if viewing the login page, the system template will display the login box part of the page.
- addon/ folder : Addon Templates : Not normally found in a template set, these template files would replace same-named template files within the addon's templates folder. Changes may be required after updating an addon.
You can find more information on the tools that are available to use on template sets, in the documentation on this page.
Template Sets Columns
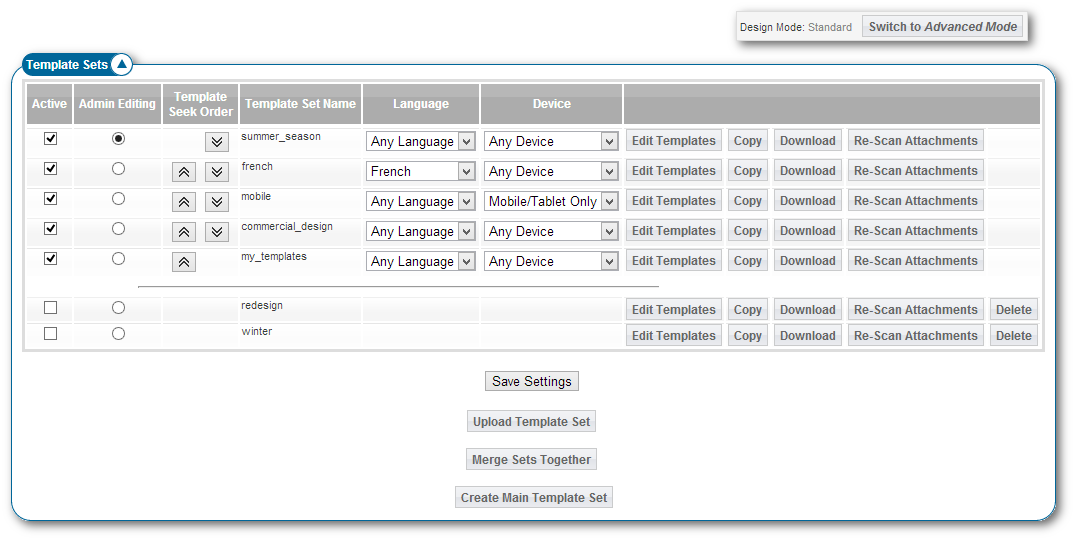
Active
This column will have a check-box for every template set. When displaying a page, and the system is looking for a particular template, it will look through any template sets that are marked as active on this page.
The default template set is always active, so that if a template is not found in any of the other template sets, the one from the default template set will be used.
The active template sets will be grouped together on the page, as shown in the screenshot above. Check or un-check the box then click Save Settings, to activate or deactivate a template set from being used when viewing the client side.
Admin Editing
This column allows you to select which template sets you are currently editing in the design section of the admin panel. In standard mode, you can only edit a single template set at a time. You can edit active or even in-active template sets.
When changing things in the admin panel, it will never allow changes to be made to any templates or media files that are not in the selected template set(s) currently selected for "admin editing".
<tip c n>Tip: If you are working on a new design, change Admin Editing selection to the template set for the new design. That way you won't ever accidentally affect the current design while working on a new one!</tip>
Template Seek Order
This column allows you to change the template seek order, amongst the active template sets. This column will only display if there are 2 or more active template sets besides the default template set6).
The default template set will always be the last template set among the active template sets, you will not be able to change the seek order of the default template set. This is because the default template set will be the last place the system tries to look for a template.
For more info on why the seek order is so important, read over the How a template set is chosen section below.
Template Set Name
This will be the name of the template set, which is the folder name for that template set.
Template Set Buttons
There are a number of buttons next to each template set that do various things with the template set.
Edit Templates
This button will appear next to any applicable template set. It is basically a shortcut that does the following:
- Changes Admin Editing to select the template set.
- Takes you to the page Design > Manager directly to the main_page/ sub-folder for the template set.
Copy
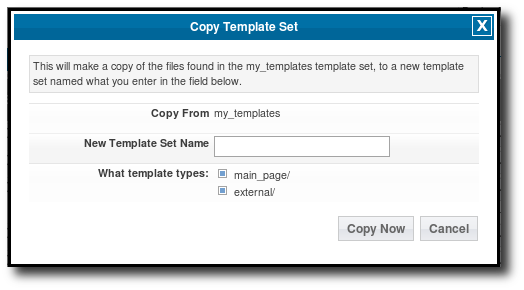
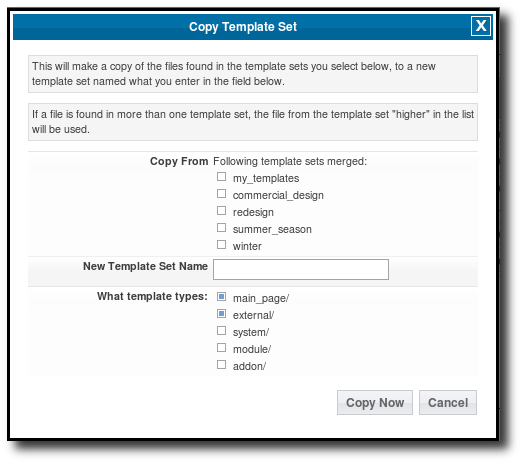
This button will open a dialog similar to the screen-shot below:
Once you enter the new template set name, click the Copy Now button to perform the copy, or Cancel to cancel the action. Below the fields in the dialog are explained in more detail.
Copy From
This will be the template set you are copying from. Make sure it is the one you intended to copy.
New Template Set Name
Enter the name for the template set copy you are creating. The name must be alpha-numeric (since it is used for the folder name) and it cannot be something that already exists.
What Template Types
Check the box next to each "template type" (in other words, the direct sub-folders for that template set). It is recommended to only copy main_page and external (the ones checked by default), but if you are making this copy for "backup" purposes you will want to check all types. Keep in mind that for system, module, or addon templates you should not create a copy outside the "default" template set, except for files you intend to customize.
Note that it will only show the types that exist in the template set being copied.
Download
<tip c n>Note: The download functionality requires the server to have Zip support installed for PHP. If your site does not have this requirement, it will say so in the dialog.</tip>
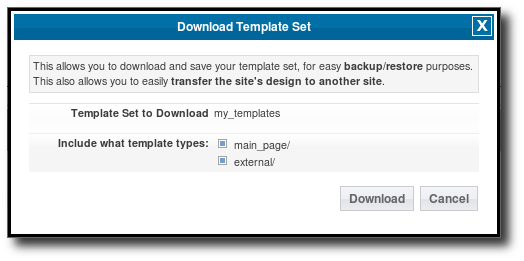
This button will open a dialog similar to the one displayed below, to allow downloading the entire template set for backup or portability purposes.
Check what parts of the template set you wish to download, then click the Download button to download a zip file containing the template set, or click Cancel to cancel the action. Below the fields in the dialog are explained in more detail.
Template Set to Download
This is the template set that will be downloaded, make sure it is the one you meant to download.
Include What Template Types
Check the box next to each "template type" (in other words, the direct sub-folders for that template set). It is recommended to only download main_page and external (the ones checked by default), but if you are making this copy for "backup" purposes you will want to check all types. If you are creating a template set to distribute, note that if you have system, module, or addon templates and you select to download those when creating your template set package, the template set will most likely need to be updated in newer versions of the software, in other words it will be heavily tied to the version the template set was first created on.
Re-Scan Attachments
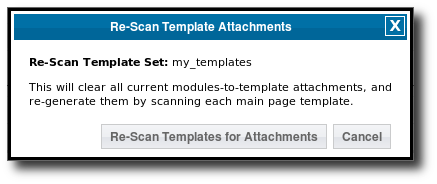
Using this button will open a dialog similar to the one below:
On the dialog, click Re-Scan Templates For Attachments button to perform the re-scan for the given template set, or click Cancel to cancel the action.
If you prefer to edit templates directly using FTP or another file manager, and edit files "locally" rather than through the admin panel, this is a button you will most likely be using quite often. What is does is it scans each template in the main_page/ folder for that template set, and finds everything "attached" to that template. Using what it finds, it updates the attachments set for that template set.
Note that if you edit a template using the admin panel, or even upload a file using the admin panel, it will do the re-scan of the attachments for that file automatically. You will only need to use this button if you have made template changes outside of the admin panel.
<tip c n>Tip: If a module or addon tag's contents is not displaying, use the re-scan tool to re-generate the attachment files for the template set.</tip>
Re-Scanning Default Templates
Never edit the default template set! See Default Template Set - do not change! for more info on why.
Why use re-scan templates for default template set, if you should not edit it anyways? The purpose, in a nutshell, is to re-copy any templates added by adons to the default template set, something that is normally done when an addon is installed or updated.
Since this is already automatically done when an addon is installed or updated, this tool is only used for the following situations:
Import Text Changes
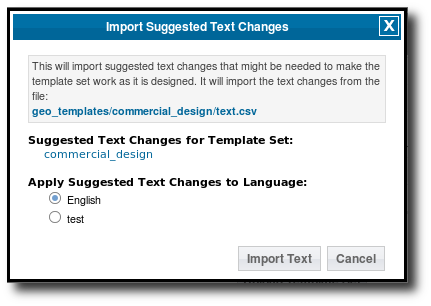
Note that this button will only show for active template sets. This button will open a dialog similar to the one shown below:
Using this tool will allow you to import text changes that are recommended by the template designer, for a template set to display as intended. Such text changes usually involve when there are HTML directly in the text, usually images that are part of language text entries.
<tip c h>Tip: Template Designers - If you need a certain text entry or entries to be altered for your design to display as intended, you can create your own text import file. The format is exactly the same as is used for the main text import/export routines, you only need to include rows for text entries that need to be changed. To use it, just include the text.csv file in the main folder for your template set.</tip>
The fields in the dialog are explained in more details below:
Import text.csv File
In the dialog, in the info box at the top it will display the file name for the text import. It will be text.csv inside the template set folder. It is highly recommended to view and possibly edit the text import file listed before performing the update! 9) If you use a language other than English (or whatever the text import file language is used), you will need to edit the file to translate the text prior to importing the changes.
Suggested Text Changes for Template Set
This is the template set the text changes are "from", make sure it is for the template set you wanted.
Apply Suggested Text Changes to Language
Select which language to import the text changes to. Remember to translate the text file prior to importing it!
Delete
Note that this button will only show for inactive template sets. This button will open a dialog similar to the one shown below:
This tool will allow you to delete an entire template set from the admin panel. Note that the template set, and all contents in the template set, must be writable in order to delete the template set. If there are any files that are not able to be removed, only part of the template set will be able to be deleted, if any at all.
The delete tool has a 2 part confirmation, to make it harder to accidentally remove a template set. You must change the radio box selection to Yes, delete template set, then click the button DELETE Now, failure to do either of these will cancel the deletion.
Make sure you are deleting the correct template set! It will display which template set is being deleted in the tool box. In the screenshot above, the template set black_primary is the one that is being deleted. Once a template set has been deleted using this tool, there is no way to undo the deletion. If you made a backup of the template set prior to deleting it, you may be able to restore the backup. Once deleted the template set cannot be restored without an external backup made prior to the deletion, if you did not make a backup then it cannot be restored.
Upload Template Set
<tip c n>Note: The upload functionality requires the server to have Zip support installed for PHP. If your site does not have this requirement, it will say so in the dialog.</tip>
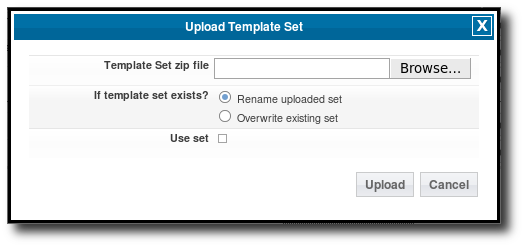
Use the upload template set button that is below the list of template sets, to upload a template set from a 3rd party template designer, or to restore a template set previously downloaded for backup purposes. The dialog will look similar to below:
Select the template set to upload, then click the Upload Set button to upload that template set, or click Cancel to cancel the action. Below is more information for each of the fields in the dialog.
Template Set zip file
Use the Browse button to select the template set zipped file on your local computer.
If template set exists?
If you are uploading a template set with a name that is the same as a template set already in existence on your site, select the appropriate option for whether you want to rename the template set being uploaded, or replace the existing template set.
Use set
Check the box to make the template set being uploaded automatically activated (with the checkbox for the Active column checked).
Merge Sets Together
This button will open a dialog similar to the one below:
This is handy if you have multiple template sets being used, you can merge all the templates into a single template set to make it easier to manage. What this will do, is allow you to select which template sets you want, then "merge" them into one template set, and save the template set using the name that you specify in the merge dialog.
If a particular template or file exists in more than one of the selected template sets, the one that is used is the one that would have been chosen by the template system, or the one that is in the template set "higher up" in the Template Seek Order.
<tip c n>Tip: The Merge Sets Together button is a handy tool if you currently have your templates scattered across a few different template sets, and you want to combine them into one single template set!</tip>
See below for more information on each field within the dialog.
Copy From: Select which of the template sets you wish to merge together.
New Template Set Name: Enter the name for the merged template set. The name must be alpha-numeric (since it is used for the folder name) and it cannot be something that already exists.
What template types: Check the box next to each “template type” (in other words, the direct sub-folders for each template set). It is recommended to only copy main_page and external (the ones checked by default). Keep in mind that every system/, module/ or addon/ file that exists in a template set, may require changes when you update the software to a newer version, so only use such files in a template set that you intent to customize.
Advanced Settings
This section displays advanced settings, most of which will only display when in advanced mode. See the sub-sections below for an explanation of each setting.
Use Google Libraries API
This setting Added in 6.0.0.
Using this feature allows certain JS libraries to be loaded from the Google Libraries API instead of loading them from your local site. This provides 2 main advantages:
- Google Libraries API uses compression by default, if the browser is capable of handling it, so that the file downloaded is much smaller than if no compression was used. This makes the page load that much faster.
- Since it loads off of a common location (from Google's site), if the user has ever visited any site that uses the same library, they will already have the files in the browser cache, in which case it will not need to download anything!
Note that this only uses Google Libraries API for the client side10), the admin will always load the JS libraries "locally". This is done in case the Google API key entered is invalid, you will still be able to use the admin panel (and be able to enter the correct key).
Google API Key: You must sign up for a Google API key to be able to use the Google Libraries API feature, that way Google can contact you if something is wrong. The signup is free, and only requires you to enter the website the key will be used on. See the documentation on the signup page for help filling it out.
Free Sign-up for Google API Key
Note that this Google API Key is the same one used for Google Maps Addon, if you have that addon and are updated to at least 1.0.8, it will share the same setting value for the Google API Key, and may already be filled in for you11).
CHMOD 777 Files
Leave this box checked if you are not sure if you need it.
If this setting is turned on, any file operations made to files and folders within geo_templates/ folder, will be CHMOD to 777. This is necessary on some servers in order to be able to edit and over-write the file or folder using FTP, if you wish to edit the design by editing the files directly instead of through the admin panel, or if you ever wish to delete the files using FTP.
If this is not turned on, the file permissions will be set at whatever the default is for your server's configuration. On some servers, this may result in not being able to view, edit, or delete the file using FTP since the “apache user” is usually different than the “FTP user”.
Note that this setting takes effect even if in Standard Mode, and it defaults to be checked (turned on).
Allow Edit of system, module, and addon Templates
If this setting is checked (turned on), in the admin panel, it will allow editing of system, module, and addon templates. Normally such editing is not allowed in the admin panel, since editing such files is not usually needed, and can make updates much more difficult.
Note that this setting ONLY has an effect when in Advanced Mode, and it defaults to be un-checked (turned off).
<tip c w>Warning: For your convenience, system, module, and addon templates can be edited in the admin panel when in advanced mode, and the setting is enabled in the advanced settings, but there are risks in customizing such templates, as noted below.
Risks of Customizing System, Module, or Addon Templates:
- May require compatibility changes when updating the software. Such changes are the responsibility of the site owner and are not covered by the software update service provided by Geodesic Solutions.
- Problems caused by customizations are not covered by Geo support, if support finds that something works with the "default" templates but not with customized templates, they will not be able to help further.
</tip>
Default Template Set - do not change!
We can't stress this enough, you should never edit any files in the default template set directly.
How a template set is chosen
TODO: Document the use of [template_set]file_name.tpl syntax added in version 6.0.0.
The template system uses a Cascading Template Set12) model. When the system is looking for a template to load, it looks through all of the active template sets, in the order the template sets appear in the admin. You can change that order by clicking on the up and down buttons in the Template Seek Order column. This allows you to use a collection of "partial" template sets.
For a scenario where this might be useful: Say you have a partial template set that might contain "seasonal" alterations to images and the main CSS file. No changes to your main templates are needed, it's mainly to change the look of it. During the season, you would activate the template set, and move it to be at the top of the template seek order. Now when the system is looking up the location for any of the images or the CSS file, it would find the files in the seasonal template set, and use those instead of your main ones. For the files it does not find in the seasonal template set (like all the main templates) it would find them further down in another template set that is lower in the "template seek order". Once that season is over, to go back to using the normal images and CSS file, just de-activate the seasonal template set. It can be a little confusing at first, but once you get a hang of how it works it gives you a lot of control and power to do a lot of things you would not be able to do as easily with a traditional template system.
For a more technical illustration of how a particular template from a particular template set is loaded, read on.
For the purposes of this explanation, we'll assume the following file structure exists inside geo_templates/ :
Contents of geo_templates/:
- blufyre_startrek/ [(made-up) Template set distributed by a 3rd party]
- main_page/
- [Full "main body" template set, with it's own template to page attachments and everything]
- text.csv [Text import file with recommended text changes]
- customized_search/ [We made a separate template set for 1 template file, to make troubleshooting that one file much easier]
- system/
- search_class/
- details_form.tpl [Customized search form template]
- default/
- addon/ (contains various addon templates)
- external/
- [Contains un-altered media files (images,css,js) that are used in templates]
- main_page/
- [Contains ALL overall templates and sub-templates, un-altered]
- module/
- [Contains ALL module templates, un-altered]
- system/
- [Contains ALL system templates, un-altered]
- my_templates/ [Template set containing misc. templates that are modified]]
- module/
- module_zip_filter_1.tpl [Modified zip filter module template]
- t_sets.php [File generated by template system, that stores which template sets to use and in what order to search through them]
Now, lets assume in the admin, the list of Active template sets is in the exact order listed below:
- blufyre_startrek
- my_templates
- customized_search
- default 13)
When the software is getting a template to use, this is the steps it follows when using the above setup:
- The system needs to load the template system/cart/display_cart/index.tpl to display the {body_html} for the main cart page.
- Looks for file:
geo_templates/blufyre_startrek/system/cart/display_cart/index.tpl
File does not exist, so it continues searching. - Looks for file:
geo_templates/my_templates/system/cart/display_cart/index.tpl
File does not exist, so it continues searching. - Looks for file:
geo_templates/customized_search/system/cart/display_cart/index.tpl
File does not exist, so it continues searching. - Looks for file:
geo_templates/default/system/cart/display_cart/index.tpl
File Found! - If Cache is turned on, the system saves the location that it found the file, so that next time it knows to go straight to the geo_templates/default/ directory to find it without having to look through all the other template sets first.
- This time, we're on the search page, and system is looking for the template system/search_class/details_form.tpl
- Searches through the template sets like last time. This time it stops on the file found in customized_search/ template set. Even though the file existed in default, since customized search was higher on the list, the template from that template set was chosen.

