User Tools
Sidebar
Table of Contents
Manager
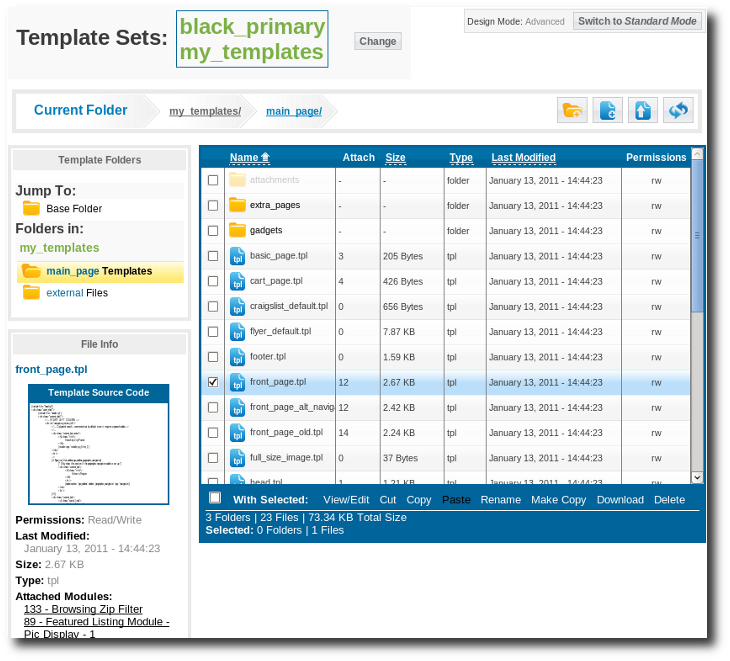
This page allows you to edit your site's design by changing files within the template set(s) you are currently working with. From this page you can edit template files, CSS files, JS Files, upload media files, move files/folders around, etc. There is a lot of information packed into a small space on this page (especially in advanced mode), it helps to think of this as a fancy file browser and editor, because that's just what it is!
There are 3 main parts to the manager, which we will go into more detail below: The Info Box (top), the Side Bar (left), and the main File Navigation (middle).
Template Set (Admin Editing)
At the top of the page, it will show what template set is currently set to admin edit under Design > Template Sets. If currently in advanced mode, it is possible to edit multiple template sets at the same time, in which case all the template sets currently marked as admin edit will display in a box. You can change which template sets are being edited in the admin by clicking the edit button next to it, or by changing which template sets are checked off on the admin edit column, in the Design > Template Sets page. When in standard mode, it will look something like the screenshot below.
You will not be able to edit any files or folders that are not within the template sets currently set to admin edit, or as it listed at the top of the page. It will also not show any templates or template attachments in template sets outside of this selection. It also affects the automatic file attachment changes. For instance, if you re-name a template file, if that template is included as a sub-template in any other templates, those other templates are automatically updated for you, but only for the ones in the template sets currently marked admin edit.
Admin Edit Tips & Suggestions
To help you get a better idea about all the different things the "admin edit template sets selection" allows you to do, read some of the tips below. Feel free to edit this page and add your own tips as well!
- If you are about to re-name a template that is referenced by other templates in other template sets, select all applicable template sets1) before re-naming the template file, so that it automatically updates all references to it, even for templates in other template sets.
- If you are doing a site re-design, change admin edit to work specifically on the new template set. This way while you work on the new design, it will have no effect on your live site, at least not until you are ready to switch over to the new template set.
Design Mode (Advanced or Standard)
On the right corner of the page, it will specify if currently in advanced mode or standard mode, similar to the screenshot below.
Click the Switch to… button to switch back and forth between advanced and standard modes. See Differences between Standard and Advanced Mode for more info.
Info Box (top)
This box at the top holds general information about the current location you are viewing in the File List, along with buttons to allow you to do things at the current location.
Current Folder
This tells you about the current folder being viewed, what you are looking at.
Create new Folder button
This will create a new folder at the current location. Some places you will not be able to create a folder, such as in the base folder or in a folder which you do not have write access. In those locations, you will not be able to create a folder, and the button will be grayed out. If you click on the button when it is grayed out, it will open a box that tells you more info about why you cannot create a new folder here.
Create New File button
This button will let you create a new template file, if within the main page templates, or create a new JS or CSS file if within the external/ folder, which holds media files. You will only be able to create a new file in specific locations. If you are not able to create a file in the current location, clicking on the grayed-out button will usually give you more information about why you cannot create a new file here.
Upload button
This button will open a dialog to allow you to upload a file to the current location. The uploaded file will over-write any existing file with the same name in the current location, so be cautious when using this. If you upload a template file to the main page templates, all the normal processing will take place just like if you had made changes to the template: it will scan the template for attachments, and automatically create or modify the modules to template attachment settings for that template.
Refresh button
This button will refresh the file list at the current location. Use this if you have made changes via FTP and wish to see the changes.
Side Bar (left)
The side bar holds quick links to specific areas within the currently viewed template set, and shows information about the file or folder currently selected.
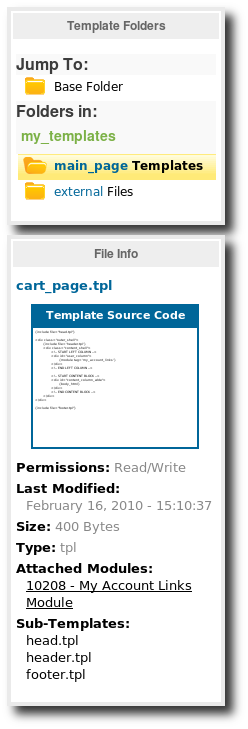
Template Folders: This will show quick links to different folders, and will change depending on the current folder being viewed.
- Jump To > Base Folder2): The link takes you to the "base" folder, the location that is displayed when you first view the Design > Manager page when in advanced mode. It will show the list of all the template sets. If you are already viewing the list of template sets this link will not display.
- main_page Templates: Takes you to main_page/ folder within the template set you are currently viewing. This link will only display if you are already within a template set that has the main_page/ folder. This is the location of all the main page templates, which are used to display the overall pages in the software.
- external Files: Takes you to external/ folder within the template set you are currently viewing. This link will only display if you are already within a template set that has the external/ folder. This is the location for all of the CSS and JS files specific to certain modules or pages, and is also where you would upload any images you wish to reference in your templates for the template set.
- system Templates3): Takes you to system/ folder within the template set you are currently viewing. This link will only be active if you are already within a template set that has the system/ folder. System templates are typically not edited except for highly customized designs, and even then, only if there is no way to accomplish a design another way4). This is because a customized system template may need adjustments when the software is updated. Due to the dynamic nature of templates in this folder, you need to enable viewing and editing these files to view or edit them.
- module Templates5): Takes you to module/ folder within the template set you are currently viewing. This link will only show if you are already within a template set that has the module/ folder. Module templates are typically not edited except for highly customized designs, and even then, only if there is no way to accomplish a design another way6). This is because a customized module template may need adjustments when the software is updated.
- addon Templates7): Takes you to addon/ folder within the template set you are currently viewing. This link will only be active if you are already within a template set that has the addon/ folder. These templates will over-write an addon's template located in the addon's folder under addons/addon_name/templates/.
<tip c n>Note: As long as you are in standard mode, or if in advanced mode, you have the advanced setting Allow Edit of system, module, and addon Templates turned off, the admin panel will not allow you to directly edit any template files that might require adjustments in an update or might be over-written in an update. When in doubt, if the admin panel allows you to edit a file, then it is safe to edit that file without worry of software update messing up your changes.
For template files that allow you to download or upload the changes, but do not allow you to edit the template directly in the admin panel, those are the templates that might need adjustments after an update. They include any templates in system/, module/, or addon/ sub-folders.</tip>
File Info:
If you have selected a single file or folder, it will display information about that file or folder in this section of the side-bar. If it is a template, CSS, or JS file, it will show a preview of the source code. If it is an image file, it will display a thumbnail of the image. Clicking on the source code preview or the thumbnail preview will bring up a larger version of the preview. If a folder is selected, it will show the folder's contents in the preview box.
File Navigation (main window)
This is the main file navigation window, which shows the list of files and folders, along with other tools and info. This section can be broken down into 3 main parts, the main file list, the File-list toolbar (bottom), and file-list info bar (very bottom).
Main File-List
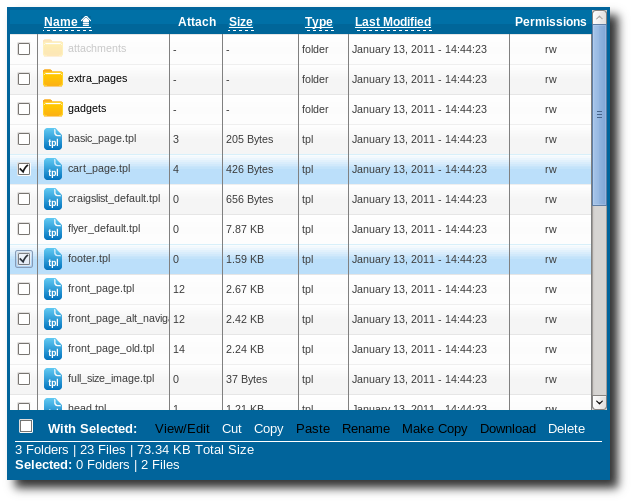
This will list all the files at the current location, along with basic info on each file or folder.
You can click on any of the column headers, except for the "attach" and "permissions" columns, to sort the file list by that column. Click the column again to reverse the order.
Columns in the file list:
- Selected: This column does not have any column title, it is the first column in the table with the check-box next to each file or folder. A row with the check-box ticked signifies that that file or folder is currently selected, and will be used for any action buttons clicked next to "With Selected" below the list.
To select a single file: Click anywhere on that file's row, and it will de-select any current selections, and only select that one file (except for folder names, as clicking on a folder name will navigate to that folder). Note that clicking on a row a second time will not de-select the file, unless you click within the checkbox column. This behavior is by design, meant to mimic how you would expect it to work if you click on a file in an actual file browser on your computer.
To select multiple files/folders: Click the checkbox or within the checkbox column for each file you want to select.
To select/de-select all: Click on the checkbox in bottom left of the table, if you check the box all applicable entries will be checked, if you un-check the box they will all be un-checked. - Name: This is the file or folder name.
- Attach8): Lists the total number of attached modules, addon tags, and sub-templates for each file within the main_page folder. Note that the counts rely on the attachments as currently saved for each file, not by actually scanning each file. If you think the counts are off, try using the Re-Scan button for the template set, on Design > Template Sets page in the admin, to re-scan the templates and save the attachments for each template.9)
- Size10): This is the physical file-size of each file.
- Type: This is the type of file or folder, usually designated by the file's extension.
- Last Modified: This is the timestamp for each file, for the last time that the file was modified. Note that this timestamp relies on the server file-system, so on some sites it may not be accurate.
- Permissions: This shows whether the file is read/write (specified by rw in the column), or read only (specified by r in the column). This permission can be affected by permissions set in the file system, and also by what type of file it is and in what template set it is located.
File-List Toolbar (bottom)
The file-list toolbar at the bottom contains the "with selected" actions that you can perform with the files and folders that are currently selected.
With Selected: tools:
- View/Edit: Use to view or edit a template, CSS, or JS file.
Required to use: 1 text-based file selected, within either main_page/ or external/ folders11). - Cut: When you cut selected files or folders, they will be added to the File Clipboard, so that you can browse to a different folder location to "paste" them. When they are cut and paste, the original files are removed, for that reason you cannot cut from the default template set, only copy.
Required to use: 1 or more files and/or folders selected, with all selected files and folders able to be written, and reside in the main_page/ or external/ folders. - Copy: When you copy selected files and folders, they will be added to the File Clipboard, so that you can browse to a different folder location to "paste" them. When they are copied and pasted, the original files are left intact.
Required to use: 1 or more files and/or folders selected. - Paste: This will copy or move the files in the file clipboard, to the current folder, if it is a sub-folder of main_page/ or external/. If cut/copied from system/, module/, or addon/ folders, it will be pasted into the same exact location as they started from, except in the currently viewed template set12).
Required to use: 1 or more files in the File Clipboard, which were previously cut or copied, and currently in a different folder than where the files were copied or cut from. - Rename: This will re-name the selected file or folder. If the selected is a template file within main_page/ - it will automatically adjust the attachment file, and search for and adjust any references to the template within other templates that are found in the current template sets marked admin edit.
Required to use: 1 file or folder selected and writable, within either the main_page/ or external/ folders13). - Make Copy: This will make a copy of the currently selected file or folder. It will allow you to select the destination folder, which defaults to the current folder, and the name of the file or folder copy. This is a good way to create a new template based on an existing template, while still leaving the original template intact.
Required to use: 1 file or folder selected. - Download: This will download the selected file, allowing you to save it and alter it on your local computer if you wish.
Required to use: 1 file selected. - Delete: This will delete all the selected files, and any attachment files as well if applicable. Before deletion, it will give a confirmation dialog and list all of the files that will be deleted.
Required to use: 1 or more files and/or folders selected, with all selected files and folders able to be edited.
File-List Info Bar (very bottom)
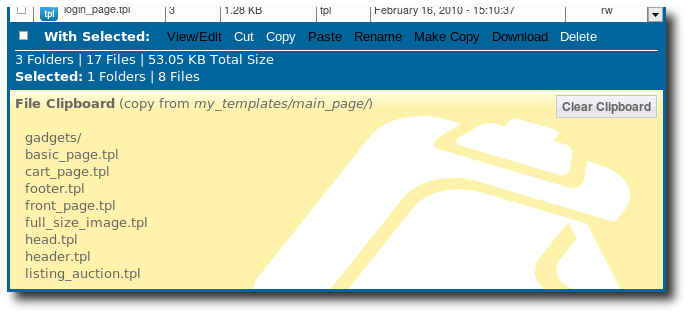
This is only displayed in advanced mode. The file-list info bar contains information about the files and folders at the current location. The information displayed will be:
- Total number of folders
- Total number of files
- Total size for all files at the current location (the size does not take into account sub-folder contents)
- Number of currently selected folders and files
File Clipboard
This section is normally hidden from view, until you cut or copy a selection of files and/or folders. When you do, the copied or cut files will be displayed in the File Clipboard which is displayed directly below the file-list info bar. Once the files are pasted, or the page is re-loaded or you navigate away from the page, the file clipboard is cleared and the section is hidden again.


