User Tools
Sidebar
Backing Up your Database
Hosting companies will typically perform database backups for all of the databases on your server on a daily basis. If your host has this service you are most likely charged for it. Then if you actually need to restore a backup to your site there could be a service fee involved and if not they may simply provide a backup that is only usable in the same backup program as the one they used to get that backup. Read the fine print with your host or ask them questions. Please check with your hosting company's policies for details regarding their database backup procedures. Because these costs and procedures we suggest you perform your own backup regularly using a program such as phpMyAdmin. If phpMyAdmin is already installed on your server (usually accessed through your domain's control panel) you can perform the steps below to run your own database backup. If phpMyAdmin is not currently installed on your server, you can install it yourself by downloading the latest stable copy from http://www.phpmyadmin.net and following their installation instructions. If you have to install phpmyadmin yourself the information you need to insert into phpmyadmin to connect to your database is within the config.php file in the root directory of your Geo installation.
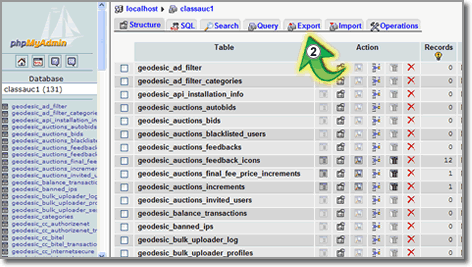
After logging into phpMyAdmin on your server, please follow the steps below to perform a backup of your database. Each step is marked with a numbered "green arrow" to help guide you through this process.
<tip c h>The page layout and required steps may vary slightly depending upon the version of phpMyAdmin that is installed on your site.</tip>
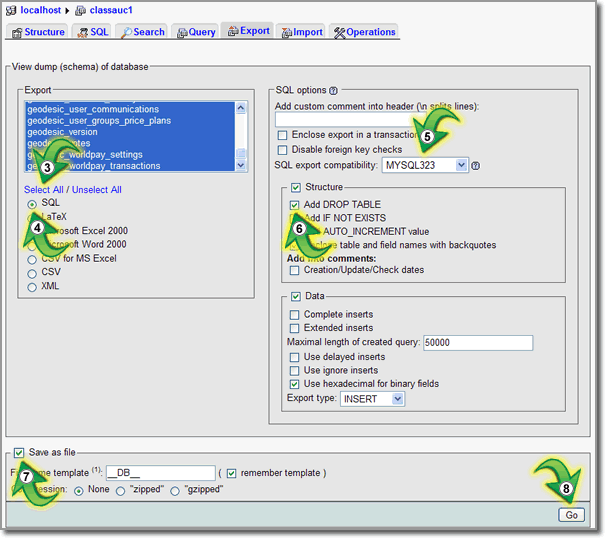
- When the screen refreshes (see image below for reference) click on the "Select All" link. All of the tables in the Export box will then be highlighted in blue.
- Next, make sure that the "SQL" radio button is selected.
- Some versions of phpMyAdmin will allow you to choose SQL export compatibility. If yours does, choose MYSQL323 from the dropdown. Otherwise, skip this step.
- Next, check the "Add DROP TABLE" box so that your exported tables will contain drop tables (This is extremely important step).
- Check the "Save as file" box. This will allow you to save the file to a location on your pc, rather than simply displaying the export on your screen.
- Finally3), click the "Go" button.
- You will then see a popup box asking you what to do with the data you are wanting to save. Select "Save to Disk" and then "OK" 4) Now choose the location on your PC that you want to save the file to.
When the process has finished, you will have a complete backup file of your database's tables in an SQL format. Essentially, what you have created is a "snapshot" of your database at that given time to be rerun at a later time if needed. That's all there is to it. Congratulations…you have just backed up your database.


