Sidebar
Table of Contents
Pages-Templates-Modules Relationship
In this section of the User Manual will explain how Pages, Templates, and Modules are all related and used together within the software. Then, in the following sections, we will discuss the basics of each.
Overview
As with any website, one of your main goals is to produce a site that is not only aesthetically pleasing to your visitors, but also provides the necessary information in a clear and concise manner. We have chosen to write this software in a manner that will easily allow for both cases. You will soon find that you can enjoy all of the same design flexibility benefits with this software as you would when setting up a typical static website. This is because the software is what we call template based (or HTML template based).
The Basic Idea
With a typical website you create and display your domain's design on the Internet using an html file (.htm or .html). While producing this file, you may have used some commercial media software such as Photoshop and Dreamweaver to create the design and generate the html that is ultimately needed. With your new GeoProduct software you will do basically the same thing. You will still use your media applications to design your site. However, instead of forcing you to create and FTP a different html file for every page of your site, you will only need to create one html file. You will then open the software's admin panel and upload your file into the system as a "template" (.tpl file). This allows you to then use that same template source over and over again, applying it to many pages of your site.
Why apply one template to many pages? Because, if there is only one source for every page, it will be easy for you to quickly edit that one source when a change is necessary, such as editing a copyright date.
How can the same source be used across many pages? The html source you create needs to contain all of the standard elements of the page (Header, Footer, Menu Bars, etc.), except for the "main content" of the page (reference the software's default basic_page.tpl Tutorial). Instead, our software will populate the main content for each page through a simple tag that you need to insert into your template's source code wherever the main content of the page would normally appear. This is one of the many advantages of the software being database driven and we will explain this in further detail later in this section.
<tip n c>Note: For this explanation, we have oversimplified things a bit to make a point and help you understand the relationship between a template and a page. The fact is, you can have as many templates as you like in the system and assign one to each page, or one across multiple pages.</tip>
By default, we give you a set of html templates that you can use "as is", modify to your own desire, or completely replace with your own. Since the software uses the database to display much of the content on your site, you can design one template and use that same template across all pages of your site. Or, you can create many templates and assign them on a page by page basis. For example, if you wanted to offer an Automobiles category and a Real Estate category, you could create a completely different template for each category and assign those templates to each category respectively. Then, when visitors browse your Automobiles category they might see an "automobiles specific" header area. But, when they browse the Real Estate category, they might see a completely different header.
The software also offers what we call "Page Modules". Modules are individual functions (or features) of the software that can be displayed wherever you want them to show up on your page. Essentially, every software feature that you see on the site is a module and can be displayed wherever you want to display it. This is because each module has its own unique tag associated with it. That tag is simply inserted into your template's source wherever you want it to show up. For example, let's say on a typical website you wanted to display an image in a certain location. You would scan through your code and type in your image reference like so:
<img src="Your_Image.jpg" />
This same basic principle applies when you want to add one of the software's modules to your site. Simply scan through your code and type in the module tag for the desired module, such as the "hottest listings (ads) module":
{module tag='module_hottest_ads'}
Wherever you place that tag is where the feature will show up on the page. If you change your mind later on its location, no problem. Simply reopen the template and move the tag to wherever you want within the html code.
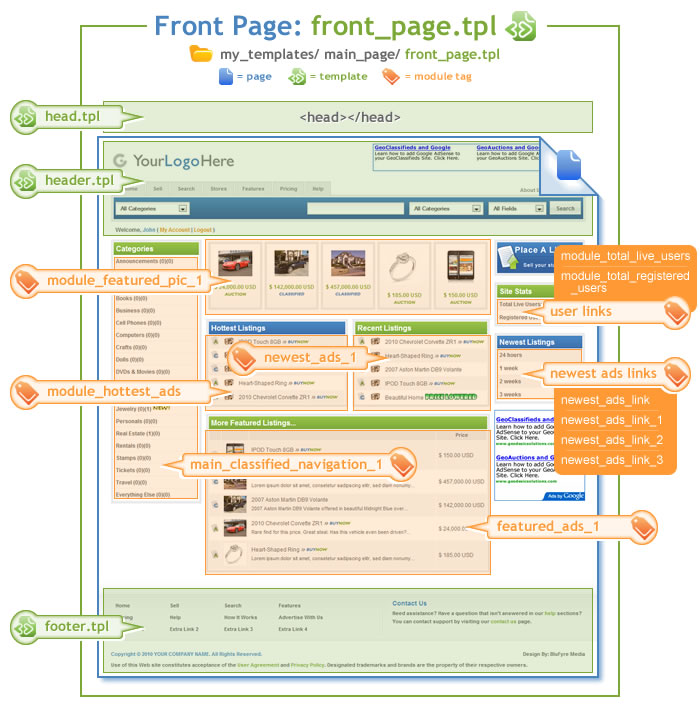
The front page of the software is made up of a combination of one template and a variety of different modules…all of which are working together to produce your front page which, after installation, looks similar to the image below:
As you may see, each feature (module) has its own "tag", which can be inserted anywhere within your html template that you desire. Therefore, if you don't like a feature where we placed it by default, simply move that module's tag within the html template to wherever you want the feature to be displayed on the page. Or, remove the tag altogether.


