User Tools
Sidebar
Importing Language Specific Template Sets
These instructions will walk you through the steps needed to use any of the Language Translations provided in the public downloads on our site.
- Create a new language in the admin panel for the language you will be importing, if you have not already. You can do that in your admin panel on the page Languages > Add New Language, just type in the name of the language and click Save. This may take a while so be patient as it creates all of the text for this new language. <
- Download the language translation template set provided in the public downloads on our site to somewhere on your computer, and keep track of where you downloaded it to. The file you will download is a zip file. You do NOT need to open that zip file as you will upload that zip file to your site. You can find that section here. <
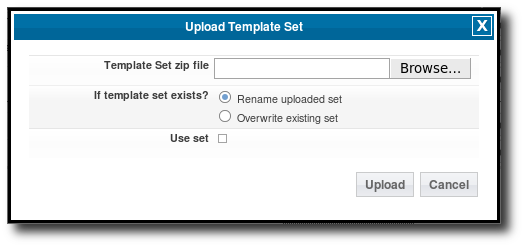
- Click the Browse button and browse to where you downloaded the language template set file to in step 2, and select the language template set file. Select the zip file downloaded and NOT any of the individual files within it. Use the option to Rename uploaded set so that if you already have another template set with the same name, it will not over-ride that template set. <
- Click the Upload button. <
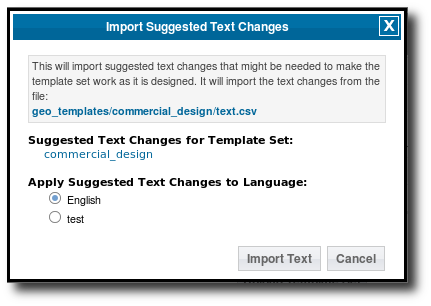
- When it is done uploading, you should see the new template set listed in the list of template sets. Click on the button Import Text Changes next to the uploaded template set. You will only see the "import text changes" button if you are in "advanced mode" within the DESIGN > TEMPLATE SETS admin tool. When you do the button, you will see a window that looks similar to below:
 <
< - In the options for what language to import the changes to, select the language that you created back in step 1, then click Import Text. This step may take a while so be patient as it imports all the text for the language. <
- Once the import is complete, make sure the new template set is active by checking the active box next to the template set, if it is not already. <
<tip c n>Note: The template sets with translated text in them that are available on our site, only contain the templates that have translations in them, in other words the templates that have no changes from the default templates are not included with the template set. To get a "full" template set so that you can have all the templates in one place, you can use the Merge Sets Together button in your admin panel after you have followed the instructions above. What you would do, is make sure the translated template set is above yours in the list of template sets, then use that tool to merge the new template set with your main template set. If you do not yet have your main template set created, you can create one with the Create Main Template Set button near the bottom of the page.</tip>
Loading Template Set Based on Language
In the admin at Design > Template Sets, on the template set that is only meant for a specific language, in the language column select the language to use.


