User Tools
Sidebar
Table of Contents
Listing Details Image Display
Within the default software there are 3 different methods that images can be displayed within your listing details pages. They are the classic, gallery and filmstrip views.
Where do you administer the image display feature?
Look to the following section of the admin tool for those controls:
LISTING SETUP > FILE UPLOAD & DISPLAY SETTINGS > Image Block Settings (On Listing Details page)
The following setting provides the 3 different image display format choices.
LISTING SETUP > FILE UPLOAD & DISPLAY SETTINGS > Image Block Layout
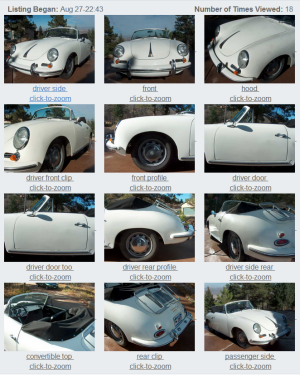
Classic Listing Details Page Image Display
This displays a grid format where all images are displayed within the max width and max height of the "all thumbnails" configuration here:
LISTING SETUP > FILE UPLOAD & DISPLAY SETTINGS > All Thumbnails (max width and max height)
The number of columns used here is set here in the admin tool:
LISTING SETUP > FILE UPLOAD & DISPLAY SETTINGS > Number of Columns (Classic View only)
When you click on any of the images you'll be shown the large version of that image. How that image is displayed will be controlled by the following admin tool setting:
LISTING SETUP > FILE UPLOAD & DISPLAY SETTINGS > Enlarge Photo View
Remember to set the size of the images and columns to display them in to fit the space you have set to display them. If you have 500 pixels of space to display them in don't set 3 columns or 300 pixel width images to display. If you had 500 pixels width to display the images in set something like 240 pixels max width with 2 columns or 160 pixel width with 3 columns.
Gallery Listing Details Page Image Display (Alternate)
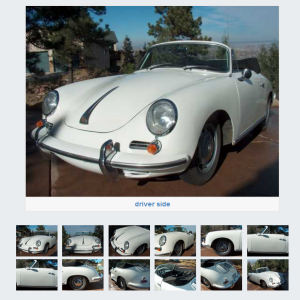
This format displays the one large image above the smaller views of the attached/uploaded images. If you click any of the smaller images it will automatically replace the large image at top and show the "image title/text" just below it. The size of the "large image" at top is determined by the following admin tool settings:
LISTING SETUP > FILE UPLOAD & DISPLAY SETTINGS > All Thumbnails (max width and max height)
The size of the smaller gallery images is controlled by the following admin tool setting:
LISTING SETUP > FILE UPLOAD & DISPLAY SETTINGS > Small Gallery Thumbnails (max width and max height)
The above example image shows thumbnails with 90 pixels width. The example gallery image below shows the small gallery images with a max width of 150 pixels:
With the gallery option when the smaller images are clicked they replace the larger image. When the large image is clicked the full size image is displayed according to the format you choose in this admin tool setting:
LISTING SETUP > FILE UPLOAD & DISPLAY SETTINGS > Enlarge Photo View
The number of rows and columns of small gallery images displayed is determined automatically by the software/css. The images are centered to the space they are within and the max number that will fit are displayed per row. So that means if you allow more images than will fit in one row for the image width you allow adjust the image width to fit the number of images evenly across rows. If you allow 8 images set image width so that 4 will fit within the space you have to display them in.
Gallery Listing Details Page Image Display (Optimized)
Recommended if using a gallery configuration.
This format displays the one large image above the smaller views of the attached/uploaded images with the behavior that the small image replaces the large image when rolled over. The behaviour is just like the gallery configuration above with a critical difference that can save a good amount of bandwidth and page load time over your whole site. Within the gallery configuration above the "all thumbnails" setting controls the size of the full size image displayed in the gallery view. But unfortunately that same configuration sets the size of the "thumbnail size image" that's created from the image the client uploads to attach to their listing. So if you want the large image to display at 400 by 400 max in the default gallery you'll need to set the thumbnail size that way. That same thumbnail sized image is used all over the site in category browsing and module display. And usually in those locations you want smaller displays. So what happens is a much larger image is referenced in all modules and category browsing features but resized down to a "normal thumbnail size" for display in those locations. There is still a "full size configuration" but if the "max thumbnail" is larger only the one "large" thumbnail is created. So the same "large thumbnail image" could be used everywhere when in actuality you want a small image used for thumbnail sized display and a larger image for larger images. The size of the "large image" at top is determined by the following admin tool settings:
LISTING SETUP > FILE UPLOAD & DISPLAY SETTINGS > Large Gallery Thumbnail
The size of the smaller gallery images is controlled by the following admin tool setting:
LISTING SETUP > FILE UPLOAD & DISPLAY SETTINGS > Small Gallery Thumbnails
The above example image shows thumbnails with 90 pixels width. The example gallery image below shows the small gallery images with a max width of 150 pixels:
With the gallery option when the smaller images are clicked they replace the larger image. When the large image is clicked the full size image is displayed according to the format you choose in this admin tool setting:
LISTING SETUP > FILE UPLOAD & DISPLAY SETTINGS > Enlarge Photo View
The number of rows and columns of small gallery images displayed is determined automatically by the software/css. The images are centered to the space they are within and the max number that will fit are displayed per row. So that means if you allow more images than will fit in one row for the image width you allow adjust the image width to fit the number of images evenly across rows. If you allow 8 images set image width so that 4 will fit within the space you have to display them in.
Recommended configurations for optimal use:
All Thumbnails - this is the size of the small thumbnail image used around the site within category browsing, featured gallery, module and small gallery images in the listing details display around the site. So setting this to a size smaller than any of those will set the software to "size up" the image at the browser level. Basically if the thumbnail image is 100 pixels square and the module display is set to 150 x 150 pixels max the image used is the 100 x 100 pixel image but resized up within the browser display. Sizing up at the browser can make for a distorted image if there is a LOT of sizing up. The software will also "size down" at the browser level if the actual image is larger than set to display where it's used. There is no distortion this way but that image could be smaller to display in the same way in the same location. So get all your thumbnail image size displays the way you want and set this configuration accordingly so there are no distortions within display. We would suggest no bigger than the largest thumbnail display you have among category browsing and ANY module display. Note if the lead picture configuration is larger than this one IT will be used to create the thumbnail image.
Lightbox Popup (Full) Image - This is the image size for the second larger image used around the site. This image will basically only appear in the listing details page, full size popup or full size image display page. Set this image size to at or larger than the "large gallery thumbnail" configuration so the larger image in the listing details page is the best it can be without distortion.
Filmstrip Listing Details Page Image Display
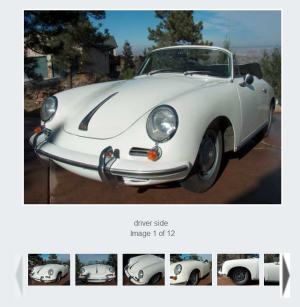
With this format there is one large image and then a "filmstrip" display of the smaller images below that. There are arrows at either end of the display that allows you to scroll through the images. When a specific smaller image is clicked it replaces the larger image. The size of the larger image is controlled by the following admin tool setting.
LISTING SETUP > FILE UPLOAD & DISPLAY SETTINGS > All Thumbnails (max width and max height)
The size of the filmstrip gallery images is controlled by the following admin tool setting:
LISTING SETUP > FILE UPLOAD & DISPLAY SETTINGS > Small Gallery Thumbnails (max width and max height)
When the large image is clicked the full size image is displayed according to the format you choose in this admin tool setting:
LISTING SETUP > FILE UPLOAD & DISPLAY SETTINGS > Enlarge Photo View
Passing Image Display Configuration Within Placement Tag
(added in v16.06)
The "image block" display within the listing details page is placed within the listing details template using the following placement tag:
{listing tag='image_block'}
Where ever that tag is placed the image block configured above will display within the listing details page. With the ability to create different template sets for desktop or mobile use there has opened a need to have different "image block configurations" for either view. Of the views above the filmstrip configuration does not resize for smaller screen display. So if the filmstrip configuration is used you would need to set the filmstrip image widths to a small size that makes it display well at the smaller screen display which may not allow that to display well on the desktop view. We created the ability to pass the "image block configuration" within the above tag. That would allow you to use the gallery view within mobile template sets and any other option within your desktop configuration. The different options you can pass are:
classic
gallery
gallery2 (recommended for mobile template sets)
filmstrip (doesn't resize for mobile screens so not recommended where mobile will be used)
You would pass those values like:
{listing tag='image_block' gallery_style='classic'}
{listing tag='image_block' gallery_style='gallery'}
{listing tag='image_block' gallery_style='gallery2'}
{listing tag='image_block' gallery_style='filmstrip'}


