Sidebar
Table of Contents
How to Edit A Category's Details
You manage all categories within the following admin tool:
CATEGORIES > CATEGORIES
Once you go into that admin tool the first you'll see are the first/top/main categories currently in the software. If you wish to edit most aspects to any of categories you only need to click the [edit] button next to each as shown here:
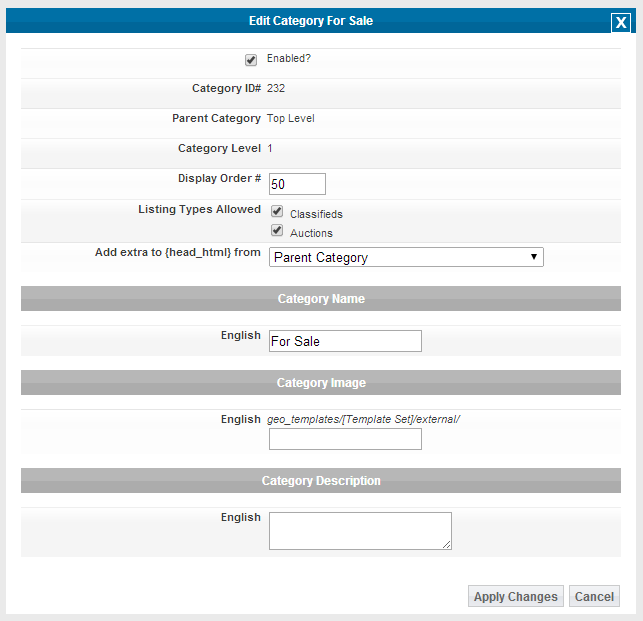
and change then you'll see a popup like the one shown here where you can edit name, description per language, display order, listing types allowed, category image,….etc:
To remove a category you only need to click the [delete] button shown next to it in the first illustration above. This will delete all of that categories subcategories also. This will also delete any configurations attached to that category and subcategories from the system. Once deleted a category cannot be returned.
To insert a category at the level you are currently looking at you only need to click the Add a New Category to this Level at the bottom of that admin tool page.
You can have as many levels of categories as you like. To "enter" a category and possibly edit/insert it's subcategories you only need to click on that category's name or click the [enter] button next to it.
How to edit a category?
To edit the any of the following attached to a category:
- name
- category icons
- field configurations
- listing types allowed
- display order among other categories of the same level (sister categories)
- set category specific "header data"
- set category specific template
- manage category specific questions
- manage category specific browsing filters
- manage category specific listing duration
- ….etc
you must "edit" that category. To do that click the edit button next to the category to make a change to within the CATEGORIES > CATEGORY SETUP admin tool as displayed in the screenshot below:
and you'll see an admin tool like:
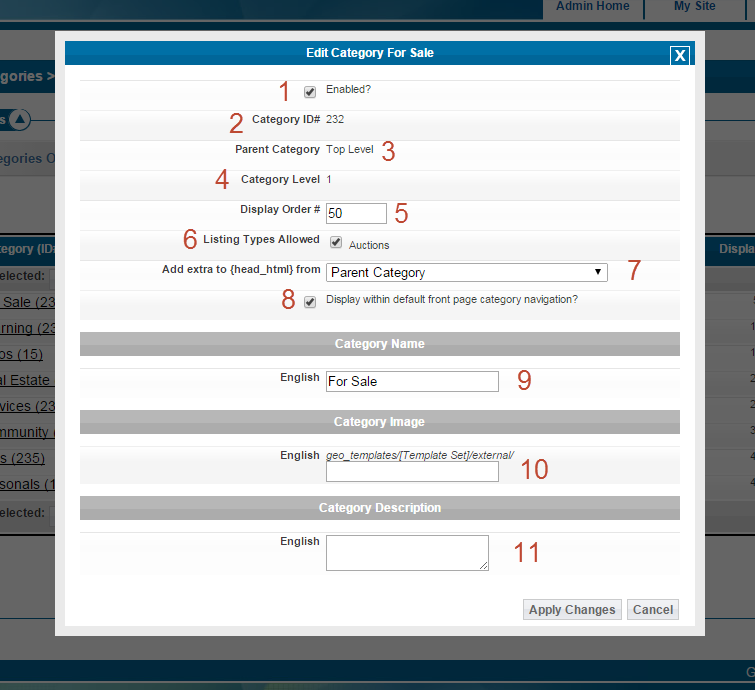
That shows the following admin tools for that category:
- enable/disable for a category. Checking this makes that category visible in all category navigation on the client side and as a choice when placing a new listing
- category id for this category. It can be used in a number of ways by different features of the software. When another feature call for a category id this is that for the current category edited. It's used mainly in creating links to categories or display category specific content at the smarty template level
- shows the parent category for the currently edited category
- shows the category level from the main/top categories the currently edited category is down within the total category structure.
- the display order of that category among it's sister categories
- the listing types you will allow into this category
- the configuration to set header elements below…if set to other than "default site-wide" you will see configurations for this category below the name and description configuration
- check this box to manually make this category disappear from the front page category navigation. If unchecked this category will appear on the front page category navigation
- Category name for the currently edited category
- the path to the category icon to use for this category. If this is empty a category icon will not be used for that category
- category description for the currently edited category. This will display within any category navigation you have the category description set to appear
Quick Enable/Disable Categories
You can click on the "enabled" and "disabled" icon within the following admin tool to quickly disable or enable a category from/to use. Clicking on the currently "enabled" icon disables that category and vice versa:
Editing Multiple Categories at Once
You can only edit multiple categories at once if they have the same parent category or are the main/top categories. If that is so you only need to click the checkboxes next to the category names you want to mass edit. Or if you want to mass edit all currently in the page click the checkbox in the blue title bar for that admin tool. Then once you have checked the categories you want to edit click the mass edit button at the top or bottom of the category list as shown in the following screenshot:
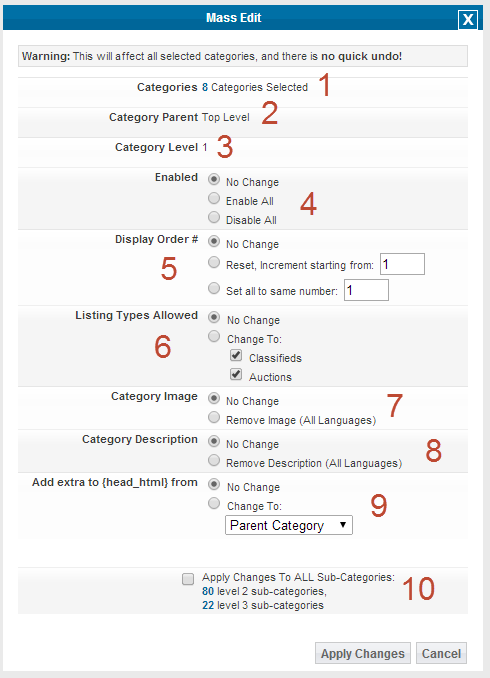
Once clicked you'll see a page like this screenshot:
Within that screenshot you'll see:
- the number of categories selected to mass edit
- the common parent for the currently selected categories (top level if main/top categories were chosen to edit)
- the current category level in the category structure for the selected categories
- enable all, disable all or leave the current selections for each category the same
- leave current display order for each category alone; Reset all category counts in the selected categories incrementally starting with the value selected; or set all display orders of the selected categories to the same
- leave current listing types allowed alone or change to the selected values set here
- leave or remove all category images at once
- leave or remove all category descriptions at once
- leave current header information or set all to use the site wide default or set all to use parent category header html
- choose to make the same changes to all subcategories of the currently selected categories


