User Tools
Sidebar
Table of Contents
Basic Page Layout
This software gives you all of the design flexibility you can possibly want. Yet, it is extremely easy to use. But sometimes it's just a little easier when you first have a little direction to get you going. So, here goes…
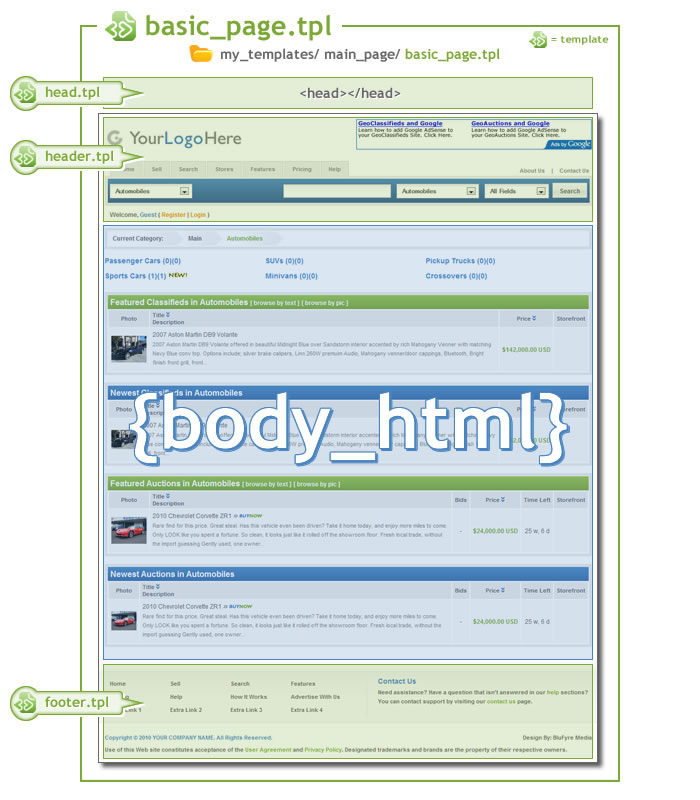
The graphic below shows you the basic components that are used by the software to build each page of your site. Virtually every page uses these same basic puzzle pieces to put it all together. That's because virtually every page uses the same overall template to build it. That is, the basic_page.tpl template. Almost all of the software's pages have this template assigned to them. There are a few exceptions, in that some pages have their own unique templates. But, we will discuss these special cases in a little more detail later on in this tutorial. For now, though, it's all about the basic_page.tpl template.
As you can see in the graphic below, the basic_page.tpl template contains the entire contents of the page. Then, within that template, you have individual templates. These include your typical 'head' data (head.tpl) which you may already know is required for all website pages. Then, you have your 'header' content (header.tpl), 'body' content (displayed by using the {body_html} tag), and finally the 'footer' content (footer.tpl).
Now, we'll break down each section for you so you'll have a better idea on how to access the content that you may want to change. Keep in mind that this same information is used for virtually all pages of your site. So, making changes in one place will typically take affect site-wide… a real time-saver.
Here is a video to help you tie what you see above to where you would find and edit the template files mentioned above:
HTML Head Element
Head Tags - As with any website driven by html, your templates require that you have a head element that gets parsed along with each html page. This isn't something that you can physically see on your site. It takes place behind the scenes. The head element contains general information, also called meta-information, about a document. According to the HTML standard, only a few tags are legal inside the head section. These are: <base>, <link>, <meta>, <title>, <style>, and <script>.
Page Width
The default design default page width is set to a relative 95% of the width of the browser window. We have also set the minimum width the design will "relatively size down" to 968 pixels. So this means that the design will size down relative to the browser window unless that browser window goes smaller than 968 pixels width at which time the design will stop sizing down. For any browser window smaller than 968 pixels the design will still fix to 968 pixels width and the browser will then start displaying the sliding bar at the bottom of the browser window allowing the client to slide left and right to see the full design. You can certainly change the default width to a different value but note that we have created the design to look good at 968 pixels width or larger. If you make a change in the width to something smaller that 968 pixels you may need to make changes within the design elements themselves to have a good look. To make a change to that width look within the theme_styles.css css document referred to throughout this document. Look for the outer_shell css value and you will see the values we have explained here. Change them as you wish following css rules.
Header Area/Site Logo
The header is made up of a combination of several elements including html, module tags, and css.
Logo - So, how is the "YourLogoHere" image being displayed? Real simple. It is a file in the template file system. Its default location is within the directory mentioned below. The image is called "logo.jpg" and is located in the software's files here:
my_templates/ external/ images/
You can upload your own logo file using FTP1) or through the admin panel's Design > Manager menu. If you are uploading through the Geo admin tool go to the DESIGN > MANAGER admin tool. This would be the click path if your custom template set were my_templates:
DESIGN > MANAGER > [my_templates] > external > images
If you are not already within your working template set (usually "my_templates" unless you changed that) then you only need to click the /external directory and then the /images directory to put yourself in the /images directory. Then click the upload button in the top right of the DESIGN > MANAGER tool. It's the button with an up arrow inside it. Click it and within the popup that appears click the browse button to select the image you wish to use from your local computer. If your image is a jpg image you only need to enter "logo.jpg" into the "upload as" field after choosing your image and your image will overwrite the current logo.jpg file. If you overwrite the current "logo.jpg" file (with exact name) you'll NOT need to make any changes in your header.tpl to reference the new file name. If you uploaded a image file type other than jpg or a file name other than "logo.jpg" you'll need to edit the header.tpl template to reference this new image file name. Changing your logo image (by overwriting logo.jpg with yours or changing the header.tpl file to reference your own uploaded image) will automatically replace our logo image with yours throughout the site wherever that image is displayed. If your logo file is of a different file type or different file name you can still upload to the same directory as the logo.jpg file, but you will need to go the extra step to edit the header.tpl template file in your template set to reference the uploaded file instead of the "logo.jpg" file currently there. If you need to edit the header.tpl file click to edit it in the /main_page directory of your template set within the DESIGN > MANAGER admin tool. Within the source code of the header.tpl template find "logo.jpg" in the html img tag that displays the logo and exchange "logo.jpg" with the file name of the image you uploaded above. With the way that template sets work in 5.0+ you do not have to worry about a software update over-writing your own, as long as it resides in your custom template set.
If you wish to use a different file name, you will need to update the image tag in the template file used by the system. Most of the pages in the system use the my_templates/main_page/header.tpl template, and so changing here will change where the logo displays for most of the site. But to find all places where "logo.jpg" is used you will need to use the DESIGN > TEXT SEARCH admin tool, search for "logo.jpg", click the template contents tab in that tool and you will see the "logo.jpg" file as is referenced. Go to each of these files and change the "logo.jpg" file reference to that of the file you wish to use and have uploaded. You may wish to edit all those template files to change the alt and/or title attribute's for that image as well.
Site Search Box - This data is displayed by inserting the module_search_box_1 tag into the template. Changing the position of this element of the design can be controlled in the theme_styles.css file, located at my_templates/external/css/theme_styles.css. The default design "fixes" this element to a specific position on the page. To change that position look for the "SEARCH BAR STYLES" section of the theme_styles.css file.
Navigation Bar
Nav Bar Colors / Attributes - The nav bar is displayed by CSS controls within the theme_styles.css file. You will find its attributes by searching the theme_styles.css file for the NAVIGATION BAR STYLES section.
Managing the Bar - As mentioned previously, the navigation bar's HTML is located within the header.tpl template. So, if you would like to change the text on the tabs, delete tabs, or add new tabs, you will need to access the header.tpl template and find where the existing tabs are located in the HTML. The image below shows you where the tabs are located in the template. To add a new tab, simply copy/paste the existing HTML for one of the tabs. We have highlighted an example below of a copied tab. You'll just want to give the new tab its own text and insert the new link URL.
Body HTML
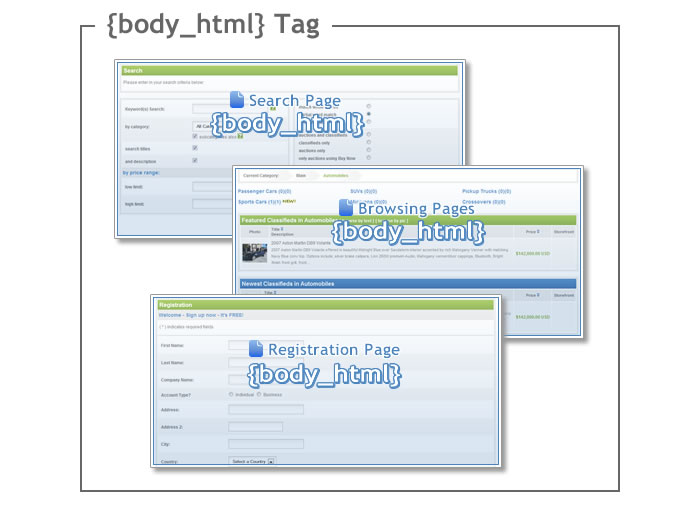
Body HTML - The image above shows just a few examples of page content that gets displayed simply due to having the {body_html} tag within the template. As mentioned earlier, the {body_html} tag is what is used within a template to display the main contents specific to that particular page.
In other words, when a visitor views a page, such as the "search page", the software instantly scans the template2) (i.e. basic_page.tpl) for the {body_html} tag. Wherever it finds that tag, it then pulls the search page content (i.e. the search form) from the database and displays it in place of the {body_html} tag. This same procedure occurs for all pages of the software, whose attached template has the {body_html} tag within it. So, even though most pages use the same basic_page.tpl template, they all have their own unique content to display.
NOTE: You can further customize the content that is displayed by applying various switches and settings in the admin panel for each page.
Category Browsing Changes Starting With v7.1
The category browsing, newest browsing, tag browsing and search results features now use customizable browsing sub templates that are placed within the /main_page/browsing_sub/ directory of your custom template set. The "browsing templates" were becoming some of the most modified system templates so we decided to move the most edited part of those templates into the default templates copied to your custom template set. With v7.1 you'll see the following new directories in your /main_page directory of your template set.
/browsing_sub/
/browsing_sub/show_all_fields/
Also within the v7.1 release we added different views listings can be view in while in the category, newest, tag and search result browsing features. The grid view has always been in the software. The list and gallery view have been added for v7.1. If you allow it your clients can change their view of listings between any of the three at any time. You can also set one of the three as the default view used. You can also choose to use only one, two or all views on your site through the following admin tool settings:
SITE SETUP > BROWSING SETTINGS > DEFAULT BROWSE VIEW
SITE SETUP > BROWSING SETTINGS > DISPLAY BROWSE VIEW LINKS
The templates in /browsing_sub control how each listing is displayed when browsing the site using the applicable view. It is not the template for the entire browsing section, just the part that displays each listing. The looping code is not included to make changes to this easier. Note that the gallery and list view templates in the /browsing_sub folder do not include all possible fields displayable. So you may turn on any of the site wide optional fields for display within the category browsing feature within the LISTING SETUP > FIELDS TO USE admin tool but they will not display within the default gallery and list views. This doesn't mean you can't display all the possible data but it would require a bit of customization to the gallery.tpl and list.tpl templates in the /browsing_sub directory to display certain fields configured to display in the admin tool. You only need to place the requisite tag for that field where you want it to display within that template. We do not add all field tags so as not to clutter the default templates with code. Fear not. If you actually want to display a lot more fields you can look to the gallery.tpl and list.tpl templates within the /browsing_sub/show_all_fields/ directory. Those include all possible field tags that can be displayed within the gallery and list views. You can use these (one or both) templates by simply copying them to the /browsing_sub directory and overwrite the files of the same name. If you do that you only need to turn on a field in the LISTING SETUP > FIELDS TO USE (and category specific field configuration if one applies) to make it appear.
<tip c v>The gallery.tpl and list.tpl templates is used to display the contents of each listing "box" when browsing the site using gallery/list view, during normal browsing. Since this template has a lot more "Smarty Tags" than normal, you can only edit using the code view.
If you try to use WYSIWYG editor to edit this template, there is very high chance that it will corrupt the smarty tags</tip>
<tip c v>If you want to use the uncluttered default gallery.tpl and list.tpl templates and need to add just a couple tags you can always find those tags within the /browsing_sub/show_all_fields/ templates of the same name</tip>
Footer Area
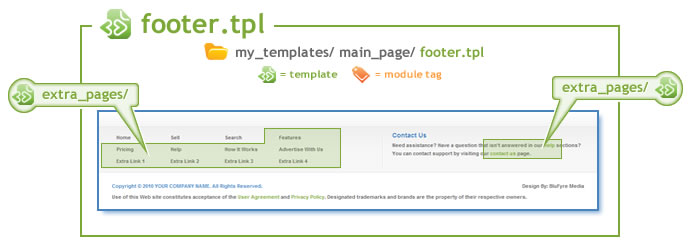
Footer - Okay, we're almost done with the basic_page.tpl template. So, how is this footer being displayed? You guessed it… the footer.tpl. This is the template that displays the entire footer. So, if you want to change the text links, copyright information, etc. they are all handled by this template.
Notice that there are quite a few links in the footer. The first few simply point to other basic pages of your site. The rest of them, marked above with the extra_pages/ tpl notes, point to your site's pre-set "extra pages". We have set up extra pages in the software with default content for you to use if you like. If you don't want to use them, simply remove the link for that page from the footer.tpl. If you do want to use them, however, you will likely need to make some text changes to each page. You can find the template assigned to each extra page by going here in your software's DESIGN menu:
my_templates/ main_page/ extra_pages/
Well, by now you should be an expert on how the basic_page.tpl template works. The remaining software templates were all built out of the basic_page.tpl template, so their structure is very similar.


