Sidebar
Table of Contents
Verified Account System
This feature allows users to verify their validity. By charging a small fee (default $1) to new users, you can be more certain that they are legitimate advertisers and not just spammers. Once the payment is complete, users will receive a "verified" badge that will appear next to their usernames and/or next to the title of any listings they place. An icon also appears in the listing details page for any listings placed by a verified account.
This is done as an anti-spam measure, since most spammers are not willing to pay money to spam a site. It is the most useful on sites that offer free listing placement and might get a high quantity of "spam" classifieds or auctions. When a visitor sees that the classified ad was placed by a verified account, it helps to identify that listing as legitimate.
The feature may not be for all sites, particularly sites that only allow anonymous listings, or have closed registrations, or sites that "always" charge for listings and as such do not get very many spam listings.
The main capabilities:
- Charge $1 (or any amount you wish) to "verify" an account. <
- Accounts can be verified by purchasing anything on the site (such as, perhaps, a listing extra) or by purchasing the dedicated "verify account" item.<
- If an account is not verified, it can optionally force require admin approval for anything that account does. <
- You can use the default "verified account" icons, or switch to one of the alternative icons, or even create your own icon. The icons are language-specific so can create different icons for each language on a multi-language site. <
- The amount charged to verify the account can be credited to the user's account balance. <
Main Settings
You turn this feature on/off in the admin at Site Setup > User Account Settings, in the section Verify Account Settings1). In that same section, when it is turned on you will see additional settings specific to how the account verification will work.
All Order Items Require Admin Approval
Turning this setting on will "force" it to require admin approval, regardless of whether it is set to require admin approval or not in the plan item cost specifics page, if the account is not verified. So if you have it configured to require admin approval for just "listing edit" and nothing else: If an account is not verified, it will require admin approval for any action, including placing listings, editing listings, renewing or upgrading listings, etc. If an account is verified however, it uses the settings as you have them set, so in this example a verified account would be able to place a listing, renew a listing, etc. without needing admin approval. But if they edit a listing, that would still require admin approval since it is set that way for the price plan.
In other words, this option only affects non-verified accounts by forcing "require admin approval" for everything, once an account is verified it relies on whatever the settings are set to in the price plan settings. Most sites that want to use this option, will turn on the option to require admin approval for non-verified accounts, and in the price plan cost specifics page, set it so that nothing requires admin approval. Anything that you have set to "require admin approval" in the price plan settings, will be things that require admin approval when the account is verified. This is not a typical situation to still require admin approval in the cost specific settings for certain things, but you do have the power to configure it this way if you wish!
Price Plan Item Settings
When the feature is turned on "site wide", as mentioned in Main Settings above, a new price plan item Verify Account will show in the admin at:
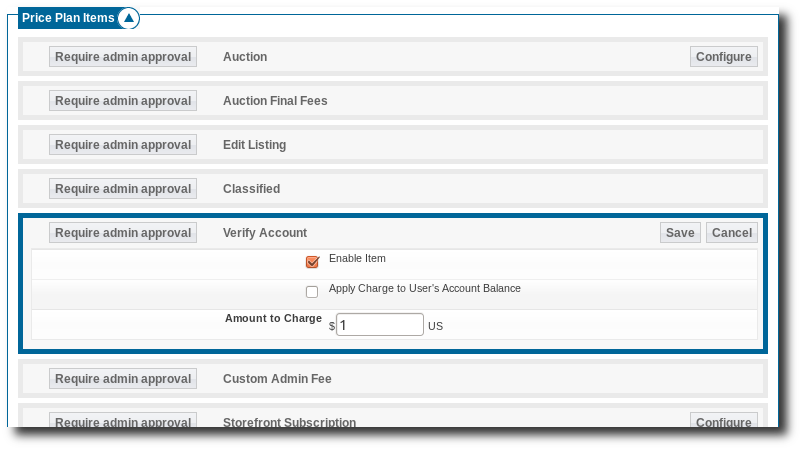
Pricing > Price Plans Home > click “edit” for price plan > click “Cost Specifics” - in Price Plan Items section near bottom. Click Configure next to the Verify Account item, and the settings available will look similar to this:
Enable Item: Un-check this box to not allow the "verify account" item to be purchased by users in this price plan. In other words, un-check this on price plans and it will remove the option for users to verify the account by paying $1 or whatever amount. Note that if you have selected to auto-verify accounts when they pay some amount, it can still verify an account that way.
Require Verified Account to place listings: Check this item in your price plan to force an account to be verified before they can place a listing into the system.
Require Verified Account to Bid On an Auction (Bidding includes "buy now"): Check this item in your auction price plan to force an account to be verified before they can bid on an auction
Apply Charge to User's Account Balance: This option is only available if you have enabled account balance gateway (Enterprise Only). If this is checked, when the user pays to verify his or her account, the amount paid will be added to the user's account balance.
Amount to Charge: This is the amount to charge to verify the account. Note that the amount charged will be in the site's currency.
Manually Verify or Un-Verify Account
For each user account, you are able to manually verify or un-verify the account in the admin panel. To do so, in the admin panel, click the Quick Find tool (top right corner of admin panel), then search for the user you wish to edit, and view the user's info. On this page you will be able to verify or un-verify the user.
Note that when browsing the admin panel, it will show a verified icon next to the username so that you can easily identify which users are verified and which are not. When a user is verified, it will look like this in the admin panel (notice the icon next to "testing1" user):
To then manually approve a user you only need to find that user and view their details. You'll see the following and be able to click the verify account button as shown here:
Icon Images
When turned on, you will be able to set 2 different icon URL's in the admin at Site Setup > Browsing Settings (Icons Used in... section), as illustrated below:
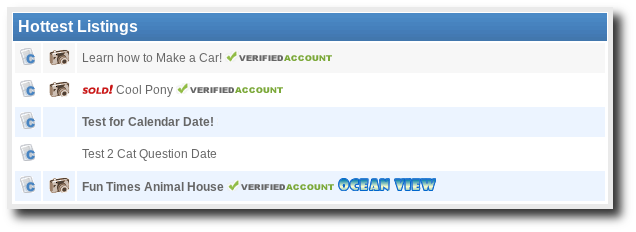
Using the default icons included, a listing placed by a verified account will look something like this when browsing the site:
Available Icons to Choose From
There are several different icons to choose from, that you would use by entering the alternate location in the appropriate icon setting mentioned above.
| Smaller Icon | Larger Icon (used in Listing Details) | Info |
|---|---|---|
 |  | Default Icons |
 |  | Verified seller alternate available |
 |  | Verified user alternate available |
| Create your Own! | Create your Own! | You can create your own icon(s) if you wish! |
Display Within Listing Details Page
You can control the placement of that verified account icon within the listing details page by placing the following placement tag:
{listing tag='verified_account'}
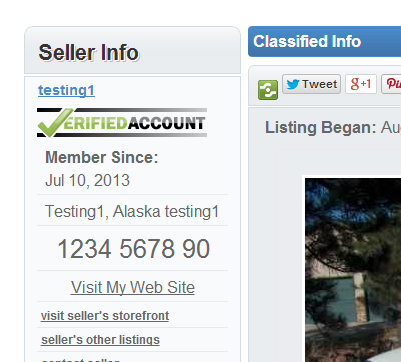
Within your listing details template. By default those templates are listing_classified.tpl and listing_auction.tpl templates. To illustrate we put the above placement tag just below the username in the listing_classified.tpl template. The result is displayed in this screenshot:


