User Tools
Sidebar
This is an old revision of the document!
Table of Contents
Signs/Flyers Setup
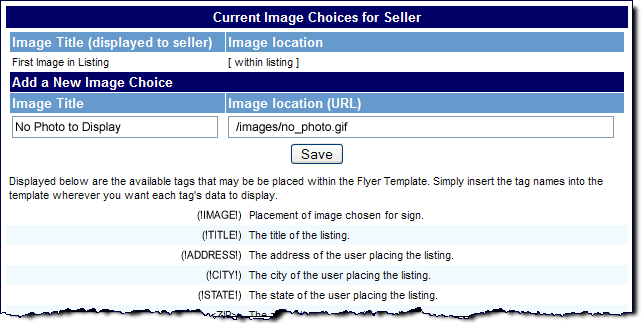
Although each of the forms (Sign and Flyer) are set up individually, their settings are identical and therefore will be explained here. The image below shows you the admin settings that are available for this Addon:
You can find the above admin tool page here in the admin tool:
ADDONS > SIGNS & FLYERS > SIGNS SETUP
ADDONS > SIGNS & FLYERS > FLYERS SETUP
Image to Use
The default image that will automatically be displayed on the seller's form once they have printed it out will be the "first" image that they uploaded when listing their item. This is usually called the "lead image" and is the image displayed within the category browsing and various modules for that listing if you have setup the software to display the thumb within those features. However, you can offer them an alternative selection (most likely if they had no images in their listing). This is done through the "Add a New Image Choice" also shown above. Simply give your image a title and then specify its URL location on your server. You will need to use a full url or relatively linked image that is relaitively linked from the client side.
Any images you add to this list will appear to the client as the possible images choices they can choose to display in the sign/flyer template where the above mentioned (!IMAGE!) tag is within the template.
Template Tags
On this same page you will see a list of tags that can be used within the template's html that is assigned to each of the pages. There is likely a default template already present on your Templates Home page in the admin for the Sign and the Flyer. Open each template and you will see some of the same tags in the html of the template. Simply add, remove, or edit the templates as you see fit with the tags that you want to use.
You have control of which data fields will be displayed within your clients signs and flyers. You will find a list of admin field control settings for the signs and for the flyers on the bottom of each of the following pages in the admin tool:
PAGES MANAGEMENT > USER MANAGEMENT > USERS CURRENT LISTINGS > FLYER FORM PAGE
PAGES MANAGEMENT > USER MANAGEMENT > USERS CURRENT LISTINGS > SIGN FORM PAGE
You will need to scroll the browser down below the template assignment and module attachment admin tools on that same page to see the individual field controls. The above two pages only control the "form" pages where your clients will enter the information that will actually be displayed in the sign/flyer. The fields you have chosen to use will appear in the above pages when the client gets to them. The data for the specific listing they have chosen to build will be pre-populated within the form. You also have the ability to control the max size of the images displayed in the signs and flyers templates here also.
Page Template Assignment
In order for the Sign or Flyer to show up for the user to print out, a template must be assigned to its respective Sign or Flyer page within the Pages Management section of the admin panel. This is done by accessing the following pages in the admin:
PAGES MANAGEMENT > USER MANAGEMENT > USERS CURRENT LISTINGS > FLYER PAGE
PAGES MANAGEMENT > USER MANAGEMENT > USERS CURRENT LISTINGS > SIGN PAGE3
There is page template for these pages. You only need to assign the


