Product/Version Based Full Update Instructions


Update Instructions:
From: GeoCore CE (Community Edition) DB Version 20.0.0
To: 20.0.0

  1. Download the latest release from the Download Section on the website. Look for the download for Full Release - Community Edition.
  2. Turn your site "off": In the admin panel, at Site Setup > General Settings change the setting Site On/Off Switch to off and save the changes.
  3. Turn Geo cache Off: In the admin panel, at Site Setup > Cache change the setting Cache System to off if it is currently on, and save the settings.
  4. Back up your current MySQL Database. Important Step! Do NOT skip!
  5. Create a full File Backup of your current installation.

    Very Important! Don't skip this step either! We cannot stress the two backup instructions enough! These backups will be your only life line in the event that something goes wrong during the update. In addition, if you have made changes to files, the file backup will be there to make restoring those customizations much easier.
  6. Locate the package you downloaded earlier, the file should be named something similar to:
    geocore-ce.zip

    If you can't find it, re-download it by following the applicable step above.
  7. Un-zip the package to a location on your PC that is easy to locate.
  8. FTP the files to your site, using an FTP program.
  9. On your server, double check the file "permissions" to make sure the following directories and their contents are writable by the “apache user”. Consider this a "troubleshooting step" though, chances are you won't need to do anything special. But if you get errors about templates_c not being writable, you may need to adjust the permissions. The following folders and their contents need to be "writable" by the apache user.
  10. Run the web-based update script located at upgrade/index.php using your favorite Internet browser, such as Firefox or Internet Explorer. For example, if your site was example.com, you would run
    http://example.com/upgrade/index.php
    in your browser.
  11. The next step in the upgrade process will take place in a browser window. The software will perform a quick check of your server to ensure that the minimum requirements to run the software are met. You will see a page similar to the image below. If the software reports that your server does not meet the minimum requirements to run the software, you will need to contact your host to make any necessary changes in order to meet the minimum requirements.
    Browser portion update page
  12. "Check" the radio button to agree to the License Agreement. You should have already performed a "database backup" and a "File Backup" earlier in this upgrade process. If you did, "check" the radio button confirming that you have backed up the entire database, and then the "Continue" button.
  13. The next screen(s) will be similar to the one below. The software will report your current version, as well as, the version you are upgrading to. Click on the "Run Listed Upgrades" button to apply the upgrade to your installation, and then when prompted, the "Finish" button to complete the process.
    Browser portion update page
  14. When you get to the last step in the Update Wizard it will give you a link to the admin panel, as well as, a link to front User Side of the software. (If you do not see these links the update is not yet complete!) Access your software's Admin Panel using the link on the last step.
  15. From the admin login screen of the software, enter your admin "username" and "password" as you ordinarily would and click the "Login" button.
  16. You should now see the Main Admin Panel screen for your software.
  17. Custom Admin Folder Name: (ADMIN_LOCAL_DIR setting in config.php) If you have NOT changed your admin folder name, you can continue to the next step.

    + View Instructions
  18. Custom geo_templates Folder Name: (GEO_TEMPLATE_LOCAL_DIR setting in config.php) If you have NOT changed the geo_templates folder name, you can continue to the next step.

    + View Instructions
  19. Using CDN / Alternate Server for External Media: The software is able to load CSS, JS, and images from an external stand alone location independent of the main website.

    If you have not previously set this up, you can skip this step. Note that this is NOT a typical setup, usually only done by large sites that require load balancing or similar.

    + View Instructions
  20. If you have turned off using the default.css file, you will need to follow the instructions below to add new CSS from the new version.

    NOTE: Disabling the default.css file is not typical. If you are not sure, you can check by:

    In the admin at Design > Settings, if the advanced setting Do NOT automatically include default.css is checked, you will need to follow the steps below.


    default.css Update Instructions +
  21. If you have custom system, module, or addon templates, follow the instructions below. Note that this is not typical, you can tell by viewing your template set folder and seeing if it has any "system", "module" or "addon" folders in them, or if Geodesic support has specifically instructed you to follow these steps.

    System Template Update Instructions +
  22. If you have any 3rd party addons, check with the addon's author to see if there are updates available for those addons. If so, update the addon(s), following any instructions provided by the 3rd party addon author.
  23. In your admin, go to Addons > Manage Addons, and look for any Addons that might need to be updated, and click the link to "Upgrade to ###" as illustrated below.
    Admin update addons
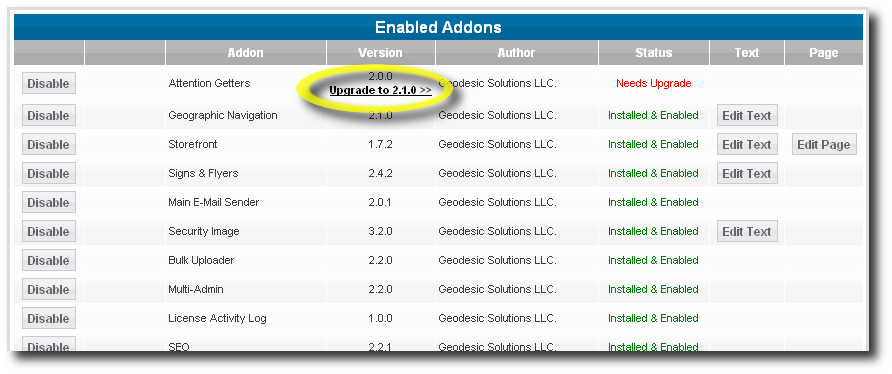
    NOTE: When updating the addons, be sure to carefully read any messages displayed, as they may contain information or instructions you will need to know.
  24. Turn your site "on": In the admin panel, at Site Setup > General Settings change the setting Site On/Off Switch to on and save the changes.
  25. If you wish, turn Geo cache "on": In the admin panel, at Site Setup > Cache change the setting Cache System to on, and save the settings.
  26. Delete the following folders and any contained files from your site:
  27. This concludes the update process. Your software should now be fully updated. Proceed to the "How this Software Works" section of the User Manual to learn how everything works.