Sidebar
This is an old revision of the document!
Templates
Templates are used to display your site’s content to visitors. This software comes with several default templates that can be used "as is", edited to your liking, or replaced with your own HTML templates. We recommend that you not delete any default templates until you have your site completely set up and working properly.
So what is a template? A template is made up of HTML code (from open HTML tag to close HTML tag) just like any other page on the Internet. It contains the overall page layout, graphics, and assigned modules (explained later) that will be displayed on your site. You can assign a different template for every page on your site or use the same template over and over for every page.
The reason why you can use the same template for multiple pages is simple. On a standard web site you will typically have a header, side menu bar, footer, and then a "content area" that you will use to put the content for that page. In this software you can use exactly the same format. However, in the "content area", instead of actually putting your own content, you will place the following tag exactly as it is shown here:
(!MAINBODY!)
What this tag does, is call to the database and pull the applicable information (dynamic data) that is tied to that specific page. Quickly review the default templates that came with your program to see where this tag is used in each of them. It’s as simple as that! As long as you have the MAINBODY tag in your template, the software will take care of the "content area" for that page.
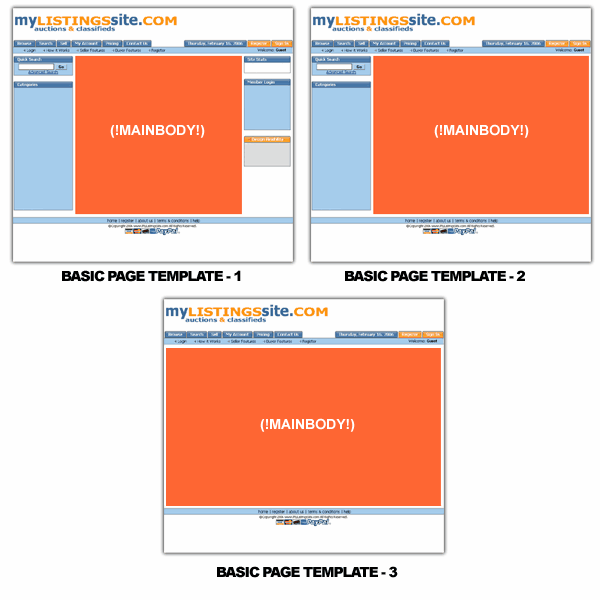
For example, when a visitor browses the "Search Page", this software recognizes which page they are on, and displays the dynamic "search" content wherever it sees that the MAINBODY tag is located within that page’s assigned template. That very same template can also be assigned to the "Login Page", "Registration Page", and every other page for that matter. All the software cares about is to search the template, find the the MAINBODY tag, and replace that tag with the correct content for that particular page. Take a look at the image below to see how we have used the MAINBODY tag within some of the default templates that you have access to from within the software's Admin Panel:
It is important to understand that the dynamic content which is displayed by the MAINBODY tag is pulled directly from the database. We want to make the distinction between the MAINBODY display properties and PAGE MODULES display properties. MAINBODY properties (settings, text, fonts, etc.) are all controlled by those settings you have made within the Site Setup Menu, as well as the other menus in the admin. PAGE MODULES properties, on the other hand, are controlled entirely by their own individual settings within the PAGE MODULES section. So, when you want to make a change to a setting on your site, you must first determine whether you are working with a MAINBODY feature or a specific PAGE MODULE.
There is another tag which should be inserted into your template's html. It needs to be within the <head> tags of the html because its purpose is to handle the software's dynamic CSS properties, and in some cases, dynamic "JavaScript":
(!CSSSTYLESHEET!)
This tag allows all of the "CSS" font and color settings that you have designated within the Pages Management menu to be displayed properly. It is also where any dynamic Javascript will be used. If you do not use the (!CSSSTYLESHEET!) tag, your text will not display correctly on your site, and other things that rely on Javascript (such as the fancy WYSIWYG editor) will not work. Each template that includes <head> tags should also contain the (!CSSSTYLESHEET!) tag.
After you have created your templates you will assign them to each page. Template assignment is done by simply accessing the Pages Submenu and navigating to the appropriate page. Once there, click the "edit" button under the "template(s) used on this page" section. You may assign more than one template to the same page if you are using multiple languages on your site. This option will not appear unless you have already created a second language in the "languages" menu. Otherwise, you will only assign one template per page. After clicking the "edit" button, simply select the desired "template" from the dropdown box and submit.
<tip c h>Tip: By default, the software is delivered to you with a template assigned to every page. If you want to implement your own design, you should consider "overwriting" our template html with your own. That way, your template. design will take affect wherever we have already assigned that template across the pages of the software. We strongly recommend, however, creating a "backup" set of templates of our originals just in case you need to reference them.</tip>


